
Painting Italian WW2 winter uniforms accurately can be a rewarding experience. This guide will help you achieve authentic and historically accurate results for your miniatures or scale models, and you can find all the necessary supplies at onlineuniforms.net. We provide diverse options for your artistic endeavors, ensuring you have the best resources for creating realistic representations.
1. Understanding Italian WW2 Winter Uniforms
1.1. What Did Italian Soldiers Wear in Winter During WW2?
Italian soldiers in WW2 wore a variety of winter clothing to combat the harsh conditions on the Eastern Front and other cold regions. Key items included:
- Wool Uniforms: The base layer consisted of wool trousers and tunics, providing initial warmth.
- Greatcoats: Heavy wool greatcoats were standard issue for added insulation.
- Winter Parkas: Reversible winter parkas, often white on one side for camouflage in snow, were utilized.
- Headgear: Wool caps, balaclavas, and fur-lined hats were used to protect against the cold.
- Footwear: Leather boots with wool socks and sometimes additional felt liners helped to keep feet warm.
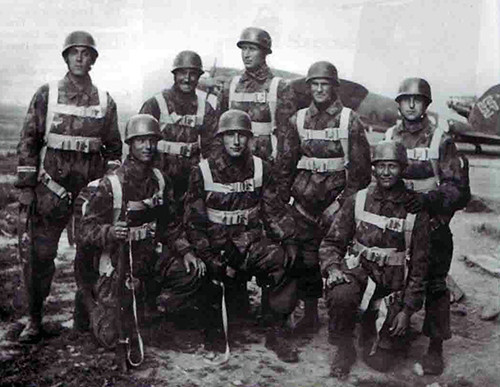 Italian troops on the Russian front, showcasing winter uniforms
1.2. What Were the Key Colors and Camouflage Patterns Used?
The primary colors and patterns included:
- Grigio-Verde: The standard Italian army color, a grey-green hue, was common for wool uniforms and greatcoats.
- Bianco: White was used extensively on reversible winter parkas and helmet covers for snow camouflage.
- Telo Mimetico: While not specifically a winter pattern, some soldiers used camouflage ponchos (Telo Mimetico) over their winter gear.
- Earthy Tones: Browns and greys were present in some winter gear variations, especially in makeshift or locally produced items.
1.3. What Materials Were Typically Used in Italian Winter Uniforms?
Italian winter uniforms during World War II primarily utilized:
- Wool: For tunics, trousers, greatcoats, and socks, providing insulation.
- Cotton: Used in linings and some underlayers for comfort.
- Canvas: Employed in the construction of tents, backpacks, and some outerwear.
- Leather: For boots, belts, and other equipment, offering durability.
- Fur: Utilized in hats and sometimes linings for extreme cold conditions.
2. Essential Painting Supplies
2.1. What Paints Do I Need?
To accurately paint Italian WW2 winter uniforms, assemble the following colors:
- Base Colors:
- Grigio-Verde (Grey-Green): This is your primary color for the wool uniforms and greatcoats.
- White: Essential for winter camouflage parkas and helmet covers.
- Dark Brown: For leather boots, belts, and other accessories.
- Highlight Colors:
- Light Grey-Green: To highlight the Grigio-Verde and add dimension.
- Off-White: To highlight the white camouflage, simulating wear and dirt.
- Shadow Colors:
- Dark Green: To add shadows to the Grigio-Verde.
- Dark Grey: To add shadows to the white areas.
- Optional Colors:
- Telo Mimetico Colors: If you want to add camouflage ponchos, you’ll need the appropriate greens, browns, and tans.
- Flesh Tone: For the face and hands, if visible.
2.2. What Brushes Are Best for Painting Uniform Details?
Selecting the right brushes is crucial for achieving detailed and realistic results:
- Detail Brush (Size 0 or 1): For fine details such as buttons, insignia, and facial features.
- Small Brush (Size 2 or 3): For base coating and applying highlights and shadows on smaller areas.
- Medium Brush (Size 4 or 5): For larger areas like the greatcoat and trousers.
- Dry Brush: A worn-out brush for dry brushing techniques to simulate texture on the wool and camouflage.
2.3. What Other Tools and Materials Are Helpful?
Additional tools and materials that will enhance your painting process include:
- Primer: Grey or white primer to prepare the surface for painting.
- Palette: For mixing paints.
- Water Pot: For cleaning brushes.
- Paper Towels: For dabbing excess paint.
- Magnifying Glass: For seeing fine details.
- Matte Varnish: To protect the finished paint job and reduce shine.
3. Preparing Your Miniature or Model
3.1. How Should I Clean and Assemble the Model?
Proper preparation is key to a successful paint job. Here’s how to prepare your model:
- Cleaning: Remove any mold lines or excess plastic with a hobby knife or file.
- Assembly: Assemble the model according to the instructions, using plastic glue or super glue as appropriate.
- Washing: Wash the assembled model with warm, soapy water to remove any residue from handling or manufacturing.
- Rinsing: Rinse thoroughly with clean water and allow to dry completely.
3.2. Why Is Priming Important and What Primer Should I Use?
Priming is essential for several reasons:
- Adhesion: Primer provides a better surface for the paint to adhere to, preventing chipping and peeling.
- Coverage: It creates a uniform base color, ensuring that the subsequent layers of paint cover evenly.
- Detail: Primer can help to smooth out minor imperfections and enhance the details of the model.
For Italian WW2 winter uniforms, a grey or white primer is recommended. Grey is versatile and works well with most colors, while white is ideal for painting light colors like the white camouflage.
3.3. How Do I Apply Primer Correctly?
Apply primer in thin, even coats to avoid obscuring the details of the model:
- Shaking: Shake the primer can thoroughly for at least two minutes.
- Distance: Hold the can about 8-12 inches away from the model.
- Spraying: Spray in short, controlled bursts, moving the can continuously to avoid pooling.
- Drying: Allow the primer to dry completely before proceeding to the next step.
4. Painting the Base Layers
4.1. How Do I Apply the Grigio-Verde Base Coat?
The Grigio-Verde base coat is the foundation of your Italian uniform. Follow these steps:
- Thinning: Thin the Grigio-Verde paint with a bit of water or acrylic thinner to improve its flow and coverage.
- Application: Apply the paint in thin, even layers using a medium-sized brush.
- Coverage: Ensure that all areas of the uniform that should be Grigio-Verde are covered, including the tunic, trousers, and greatcoat.
- Drying: Allow each layer to dry completely before applying the next. Multiple thin layers are better than one thick layer.
4.2. How Do I Paint the White Camouflage Areas?
Painting white camouflage can be tricky, as white paint tends to be thin and requires multiple coats. Here’s how to do it effectively:
- Base Coat: Apply a base coat of light grey or off-white to provide a better surface for the white paint to adhere to.
- Thinning: Thin the white paint with water or acrylic thinner.
- Application: Apply the white paint in thin, even layers using a small or medium brush, depending on the size of the area.
- Coverage: Ensure complete coverage, allowing each layer to dry before applying the next.
- Blending: Blend the edges of the white camouflage with the underlying Grigio-Verde to create a natural transition.
4.3. What Techniques Can Be Used to Achieve a Realistic Fabric Texture?
To achieve a realistic fabric texture on your painted uniforms, consider the following techniques:
- Dry Brushing: Use a dry brush with slightly lighter shades to highlight the raised areas, simulating the texture of the fabric.
- Stippling: Apply small dots of paint with a stiff brush to create a rough, uneven surface.
- Layering: Apply thin layers of paint, allowing some of the previous layer to show through, to build up depth and texture.
- Washing: Apply a thin wash of a darker color to the recesses and folds of the fabric, enhancing the shadows and adding definition.
5. Highlighting and Shading Techniques
5.1. How Do I Highlight Grigio-Verde Uniforms?
Highlighting adds depth and realism to the uniform by simulating the effect of light on the fabric. Follow these steps:
- Mixing: Mix a lighter shade of Grigio-Verde by adding a small amount of light grey or off-white to the base color.
- Application: Use a small brush to apply the highlight color to the raised areas of the uniform, such as the shoulders, elbows, knees, and folds of the fabric.
- Blending: Blend the highlights with the base color to create a smooth transition.
- Layering: Apply multiple thin layers of highlight, gradually increasing the lightness, to build up the effect.
5.2. How Do I Shade Grigio-Verde Uniforms?
Shading creates shadows and adds definition to the uniform, making it look more three-dimensional. Follow these steps:
- Mixing: Mix a darker shade of Grigio-Verde by adding a small amount of dark green or black to the base color.
- Application: Use a small brush to apply the shadow color to the recessed areas of the uniform, such as the folds, creases, and areas underneath straps and equipment.
- Blending: Blend the shadows with the base color to create a smooth transition.
- Washing: Apply a thin wash of the shadow color over the entire uniform to enhance the shadows and add depth.
5.3. How Do I Highlight and Shade White Camouflage?
Highlighting and shading white camouflage requires a subtle approach to avoid making it look too dirty or artificial. Follow these steps:
- Highlighting: Mix a very light off-white color and apply it to the raised areas of the camouflage, such as the edges of the parka and the top of the helmet.
- Shading: Mix a light grey color and apply it to the recessed areas of the camouflage, such as the folds and creases.
- Blending: Blend the highlights and shadows with the base white color to create a smooth transition.
- Weathering: Add subtle weathering effects, such as dirt and stains, to the camouflage to make it look more realistic.
6. Painting Details and Accessories
6.1. How Do I Paint Leather Boots and Equipment?
Leather boots and equipment can be painted using the following steps:
- Base Coat: Apply a base coat of dark brown to the leather areas.
- Highlighting: Mix a lighter shade of brown by adding a small amount of tan or beige to the base color. Apply the highlight color to the raised areas of the leather, such as the buckles, straps, and edges.
- Shading: Apply a dark brown or black wash to the recessed areas of the leather to add depth and definition.
- Detailing: Add small details such as scratches, scuffs, and wear marks to the leather to make it look more realistic.
6.2. How Do I Paint Metallic Details?
Metallic details such as buckles, buttons, and insignia can be painted using the following steps:
- Base Coat: Apply a base coat of metallic silver or gunmetal to the metallic areas.
- Washing: Apply a black or dark brown wash to the metallic areas to add depth and definition.
- Highlighting: Use a fine brush to apply highlights of metallic silver to the edges and raised areas of the metallic details.
- Weathering: Add subtle weathering effects, such as rust or corrosion, to the metallic details to make them look more realistic.
6.3. How Do I Paint Faces and Hands?
Painting faces and hands requires a delicate touch and attention to detail. Follow these steps:
- Base Coat: Apply a base coat of flesh tone to the face and hands.
- Washing: Apply a flesh wash or a thinned-down brown paint to the face and hands to add depth and definition.
- Highlighting: Use a fine brush to apply highlights of a lighter flesh tone to the raised areas of the face, such as the cheekbones, nose, and forehead.
- Detailing: Add small details such as eyes, lips, and wrinkles to the face to make it look more realistic.
7. Weathering and Battle Damage
7.1. What Weathering Techniques Can I Use?
Weathering adds realism and tells a story about the model, making it look like it has seen action. Here are some weathering techniques you can use:
- Dry Brushing: Use a dry brush with a light brown or grey paint to simulate dust and dirt on the uniform.
- Washes: Apply washes of brown or black paint to the recessed areas of the uniform to simulate mud and grime.
- Stippling: Use a sponge or a stiff brush to apply small dots of paint to the uniform, simulating chipping and wear.
- Pigments: Apply pigments to the uniform to simulate dust, mud, and other environmental effects.
7.2. How Do I Simulate Battle Damage?
Simulating battle damage can add a dramatic touch to your model. Here are some techniques you can use:
- Chipping: Use a fine brush or a sponge to apply small dots of silver or dark grey paint to the edges of the uniform and equipment, simulating paint chipping.
- Bullet Holes: Use a hobby knife or a drill to create small holes in the uniform, simulating bullet holes.
- Scratches: Use a hobby knife or a file to create small scratches on the uniform and equipment.
- Tears: Use a hobby knife or scissors to create small tears in the uniform.
7.3. How Do I Apply Mud and Snow Effects?
Applying mud and snow effects can enhance the realism of your winter uniforms. Here are some techniques you can use:
- Mud: Mix a small amount of brown paint with water and apply it to the lower areas of the uniform, simulating mud splatters. You can also add small amounts of flocking or static grass to the mud mixture to add texture.
- Snow: Apply a thin layer of white glue to the areas where you want to simulate snow, such as the top of the helmet, the shoulders, and the base of the model. Sprinkle artificial snow or baking soda over the glue and allow it to dry completely.
8. Sealing and Finishing
8.1. Why Is Sealing Important?
Sealing your painted model is essential for several reasons:
- Protection: Sealer protects the paint job from scratches, chips, and fading.
- Durability: It makes the model more durable and resistant to handling.
- Finish: Sealer can be used to adjust the finish of the model, making it more matte or glossy.
8.2. What Type of Sealer Should I Use?
For Italian WW2 winter uniforms, a matte varnish is recommended. Matte varnish reduces shine and creates a more realistic finish that is appropriate for historical models.
8.3. How Do I Apply Sealer Correctly?
Apply sealer in thin, even coats to avoid obscuring the details of the model:
- Shaking: Shake the sealer can thoroughly for at least two minutes.
- Distance: Hold the can about 8-12 inches away from the model.
- Spraying: Spray in short, controlled bursts, moving the can continuously to avoid pooling.
- Drying: Allow the sealer to dry completely before handling the model.
9. Historical Accuracy and Resources
9.1. Where Can I Find Reliable Information on Italian WW2 Uniforms?
To ensure historical accuracy, consult the following resources:
- Books: Research books on Italian military uniforms of World War II.
- Museums: Visit military museums with exhibits on Italian uniforms.
- Online Forums: Participate in online forums dedicated to military history and modeling.
- Historical Societies: Contact historical societies for access to archives and expert knowledge.
9.2. How Can I Ensure My Painting Is Historically Accurate?
To ensure your painting is historically accurate:
- Reference Photos: Use reference photos of Italian soldiers in winter uniforms.
- Color Charts: Consult color charts for accurate paint colors.
- Expert Advice: Seek advice from experienced military modelers and historians.
- Cross-Reference: Cross-reference multiple sources to verify information.
9.3. What Variations Existed in Italian Winter Uniforms Due to Supply Shortages or Regional Differences?
Variations in Italian winter uniforms during World War II arose from:
- Supply Shortages: Leading to improvisation and use of non-standard items.
- Regional Differences: Resulting in locally produced or modified gear.
- Unit Discrepancies: Where different units might receive varying types of equipment.
- Early vs. Late War: With late-war uniforms often reflecting greater scarcity and diversity.
- Officer vs. Enlisted: Where officers sometimes had access to better quality or custom-made items.
10. Frequently Asked Questions (FAQs)
10.1. What Was the Main Color of Italian Army Uniforms During WW2?
The main color was Grigio-Verde, a grey-green hue.
10.2. Did Italian Soldiers Use Winter Camouflage?
Yes, they used white reversible parkas and helmet covers for snow camouflage.
10.3. What Kind of Boots Did Italian Soldiers Wear?
They wore leather boots, often with wool socks and felt liners.
10.4. What Kind of Headgear Did They Use in Winter?
Wool caps, balaclavas, and fur-lined hats were common.
10.5. What Is the Best Primer for Painting White Camouflage?
White primer is best for painting white camouflage.
10.6. How Do I Prevent White Paint from Looking Too Thick?
Apply white paint in thin, even layers, allowing each layer to dry before applying the next.
10.7. How Do I Simulate Mud on a Uniform?
Mix brown paint with water and apply it to the lower areas of the uniform.
10.8. What Kind of Varnish Should I Use to Seal the Model?
Use a matte varnish to reduce shine and create a more realistic finish.
10.9. Where Can I Find Reference Photos of Italian WW2 Uniforms?
Consult books, museums, online forums, and historical societies.
10.10. How Can I Make My Model Look More Realistic?
Use weathering techniques, simulate battle damage, and pay attention to historical accuracy.
Conclusion
Painting Italian WW2 winter uniforms accurately requires attention to detail, patience, and the right supplies. By following this guide, you can create realistic and historically accurate representations of these uniforms for your miniatures or scale models. Remember to visit onlineuniforms.net for all your uniform and painting supply needs. Happy painting!
Ready to bring your miniature figures to life with authentic Italian WW2 winter uniforms? Visit onlineuniforms.net today to explore our wide selection of paints, brushes, and modeling supplies. Whether you’re a seasoned hobbyist or just starting out, we have everything you need to create stunning, historically accurate models. Contact us at +1 (214) 651-8600 or visit our location at 1515 Commerce St, Dallas, TX 75201, United States, and let our experts help you find the perfect solutions for your next project. Don’t wait – start painting your masterpiece now!