Making Excel cells uniform in size enhances the visual appeal and readability of your spreadsheets. At onlineuniforms.net, we understand the importance of presentation, whether it’s in a professional uniform or a well-organized spreadsheet. Ensuring your Excel cells are the same size is easy with a few simple steps, which also helps in data presentation, report generation, and maintaining an organized structure, and consistent formatting.
1. Understanding Uniform Cell Sizing in Excel
Uniform cell sizing in Excel refers to the process of adjusting the width of columns and the height of rows to be consistent throughout a worksheet or a selected range. This uniformity ensures a neat and professional appearance, especially important when presenting data in reports or dashboards.
2. Why is Uniform Cell Sizing Important?
- Improved Readability: Consistent cell sizes make it easier to read and interpret data.
- Professional Appearance: Uniform sizing gives a polished and professional look to your spreadsheets.
- Enhanced Data Presentation: Consistent formatting improves the overall presentation of data.
- Efficient Data Entry: Uniform cells can streamline data entry processes.
3. Methods to Make Excel Cells Uniform in Size
There are several methods to achieve uniform cell sizes in Excel, each suited for different scenarios. Here are the most effective techniques:
4. Manual Adjustment of Column Width and Row Height
The most straightforward method involves manually adjusting the column width and row height.
- Step 1: Select the columns or rows you want to adjust.
- Step 2: Hover over the boundary of a selected column or row header.
- Step 3: Click and drag the boundary to the desired width or height.
- Step 4: Release the mouse button when the size is set.
5. Using the “Format” Menu to Set Specific Sizes
Excel’s “Format” menu allows you to specify exact measurements for column width and row height.
-
Step 1: Select the columns or rows you want to resize.
-
Step 2: Go to the Home tab, then click Format in the Cells group.
-
Step 3: Under Cell Size, select Column Width or Row Height.
-
Step 4: Enter the desired value in the dialog box and click OK.
6. AutoFit Column Width and Row Height
The AutoFit feature automatically adjusts the column width or row height to fit the content of the cells.
-
Step 1: Select the columns or rows you want to autofit.
-
Step 2: Go to the Home tab, click Format, and under Cell Size, select AutoFit Column Width or AutoFit Row Height.
Note: To quickly autofit all columns on the worksheet, select Select All, and then double-click any boundary between two column headings.
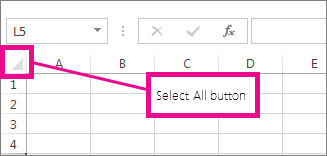 Select All button
7. Copying Column Widths
You can copy the width of one column to other columns using the Paste Special option.
- Step 1: Select a cell in the column that has the width that you want to use.
- Step 2: Press Ctrl+C, or go to Home > Clipboard > Copy.
- Step 3: Right-click a cell in the target column, point to Paste Special, and then select Keep Source Columns Widths .
8. Using VBA (Visual Basic for Applications) to Standardize Cell Sizes
For more advanced users, VBA can automate the process of standardizing cell sizes.
- Step 1: Open the VBA editor by pressing Alt + F11.
- Step 2: Insert a new module (Insert > Module).
- Step 3: Enter the VBA code to set uniform column widths and row heights.
9. Code Example
Sub UniformCellSizes()
    Dim ws As Worksheet
    Dim col As Range
    Dim row As Range

    Set ws = ThisWorkbook.Sheets("Sheet1") ' Change "Sheet1" to your sheet name

    ' Set uniform column width
    For Each col In ws.Columns
        col.ColumnWidth = 10 ' Set your desired width
    Next col

    ' Set uniform row height
    For Each row In ws.Rows
        row.RowHeight = 20 ' Set your desired height
    Next row

End Sub- Step 4: Run the macro by pressing F5 or clicking the Run button.
10. Considerations for Choosing a Method
- Manual Adjustment: Best for small adjustments and when precision isn’t critical.
- Format Menu: Ideal when you need specific, consistent sizes.
- AutoFit: Useful for quickly adjusting sizes based on content.
- Copying Column Widths: Efficient for applying one column’s width to others.
- VBA: Suitable for automating the process, especially in large or complex spreadsheets.
11. Best Practices for Maintaining Uniform Cell Sizes
- Plan Ahead: Before entering data, set the column widths and row heights.
- Use Templates: Create templates with predefined cell sizes for consistent formatting.
- Regularly Check: Periodically review and adjust cell sizes as needed.
- Consistency: Maintain consistency in font sizes and styles to avoid uneven appearance.
12. Common Issues and Troubleshooting
- Problem: Columns or rows are not resizing as expected.
- Solution: Ensure that the worksheet is not protected and that there are no merged cells interfering with the resizing.
- Problem: AutoFit is not working correctly.
- Solution: Double-check that the content in the cells is not excessively long or wrapped. Adjust the alignment settings to ensure the text fits within the cell.
13. Advanced Tips for Cell Sizing
- Using Named Ranges: Apply uniform sizing to specific named ranges for targeted formatting.
- Conditional Formatting: Combine conditional formatting with uniform sizing to highlight important data while maintaining a consistent appearance.
- Print Settings: Adjust print settings to ensure that the uniform cell sizes are maintained when printing the worksheet.
14. The Impact of Uniform Cell Sizing on Data Analysis
Uniform cell sizing can significantly impact data analysis by improving the visual clarity of your data.
- Easier Comparisons: Consistent cell sizes make it easier to compare data across rows and columns.
- Better Visualizations: Uniform formatting enhances the effectiveness of charts and graphs.
- Improved Data Accuracy: Clear presentation reduces the risk of misinterpreting data.
15. How Uniform Cell Sizing Enhances Collaboration
When multiple users work on the same spreadsheet, uniform cell sizing ensures that everyone sees the data in the same format.
- Consistent View: All users see the data with the same column widths and row heights.
- Reduced Confusion: Eliminates discrepancies in formatting that can lead to confusion.
- Streamlined Workflow: Simplifies collaboration by ensuring everyone is working with the same visual layout.
16. Case Studies: Uniform Cell Sizing in Action
- Financial Reporting: A financial analyst uses uniform cell sizing to create clear and professional financial reports, making it easier for stakeholders to review and understand the data.
- Sales Data Analysis: A sales manager standardizes cell sizes in a sales data spreadsheet, improving the readability and making it easier to identify trends and patterns.
- Inventory Management: An inventory manager uses uniform sizing to maintain an organized inventory list, ensuring that all product information is displayed consistently.
17. Integrating Uniform Cell Sizing with Other Excel Features
- Tables: Use Excel tables to automatically maintain uniform cell sizes as you add or remove data.
- PivotTables: Combine uniform sizing with PivotTables to create dynamic reports with a consistent appearance.
- Data Validation: Implement data validation rules to ensure that data entered into the cells is consistent with the uniform formatting.
18. Understanding Points, Pixels, and Inches in Excel Cell Sizing
Excel uses different units of measurement for column width and row height, including points, pixels, and inches. Understanding these units can help you achieve precise sizing.
- Points: The default unit of measurement for row height. One point is approximately 1/72 of an inch.
- Pixels: The unit of measurement for column width in Normal view. The number of pixels corresponds to the number of dots that make up the column width on your screen.
- Inches/Centimeters/Millimeters: Available when working in Page Layout view (View > Workbook Views > Page Layout), allowing you to specify column width or row height in real-world measurements. The measurement unit is in inches by default. Go to File > Options > Advanced > Display > select an option from the Ruler Units list.
19. Converting Between Units
Converting between these units can be useful when you need to match cell sizes to specific dimensions.
- Points to Inches: Divide the number of points by 72.
- Inches to Points: Multiply the number of inches by 72.
- Pixels to Inches: The conversion factor depends on your screen resolution, but a rough estimate is to divide the number of pixels by the screen’s DPI (dots per inch).
20. Using Page Layout View for Precise Measurements
Excel’s Page Layout view allows you to work with real-world units, such as inches, centimeters, and millimeters.
- Step 1: Go to View > Workbook Views > Page Layout.
- Step 2: Adjust column widths and row heights using inches, centimeters, or millimeters.
- Step 3: Verify the measurements in the Format menu for accuracy.
21. The Role of Screen Resolution in Cell Sizing
Screen resolution can affect how cell sizes appear, particularly when using pixels as the unit of measurement.
- Higher Resolution: At higher resolutions, cells may appear smaller because more pixels are packed into the same physical space.
- Lower Resolution: At lower resolutions, cells may appear larger due to fewer pixels per inch.
22. Adjusting Zoom Level for Accurate Sizing
Adjusting the zoom level in Excel can also impact the perceived size of cells.
- Zoom In: Zooming in can help you make more precise adjustments to cell sizes.
- Zoom Out: Zooming out can give you a broader view of the worksheet, making it easier to assess overall uniformity.
23. The Limitations of Uniform Cell Sizing
While uniform cell sizing is beneficial, it’s important to be aware of its limitations.
- Content Overflow: Uniform sizes may not always accommodate all content, leading to overflow or truncation.
- Visual Balance: Strict uniformity may sometimes detract from the visual balance of the worksheet.
- Specific Needs: Certain types of data may require varying cell sizes for optimal presentation.
24. Balancing Uniformity with Functionality
The key to effective cell sizing is to balance uniformity with functionality.
- Prioritize Readability: Ensure that cell sizes are large enough to accommodate the data without compromising readability.
- Consider Content: Adjust sizes based on the type and amount of content in each cell.
- Maintain Consistency: Strive for consistency across the worksheet while allowing for necessary variations.
25. Customizing Default Column Width
Excel allows you to customize the default column width for a worksheet or workbook.
-
Step 1: Do one of the following:
- To change the default column width for a worksheet, select its sheet tab.
- To change the default column width for the entire workbook, right-click a sheet tab, and then select Select All Sheets on the shortcut menu.
-
Step 2: Go to Home > Cells > Format.
-
Step 3: Under Cell Size, select Default Width.
-
Step 4: In the Standard column width box, type a new measurement, and then seelct OK.
Tips: If you want to define the default column width for all new workbooks and worksheets, you can create a workbook template or a worksheet template, and then base new workbooks or worksheets on those templates.
26. Tips for Working with Large Datasets
When working with large datasets, uniform cell sizing can be particularly challenging. Here are some tips to make the process more manageable:
- Use VBA Macros: Automate the sizing process with VBA macros to quickly apply uniform sizes to large ranges.
- Apply to Sections: Break the dataset into smaller sections and apply uniform sizing to each section individually.
- Test and Adjust: Test the sizing on a sample range before applying it to the entire dataset to ensure the desired result.
27. How to Change Column Width by Dragging
Excel provides a straightforward method to change column width by dragging the column boundary. This method is useful for quick adjustments and visual sizing.
- Step 1: Select the column or columns that you want to change.
- Step 2: Position your cursor on the right boundary of the column header you wish to adjust. The cursor will change to a double-sided arrow.
- Step 3: Click and drag the boundary to the left to decrease the width or to the right to increase it.
- Step 4: Release the mouse button when the column is the desired width.
28. Adjusting Multiple Columns Simultaneously
To adjust multiple columns to the same width, follow these steps:
- Step 1: Select the columns you want to adjust.
- Step 2: Drag the boundary of any selected column to the desired width. All selected columns will adjust to match the width of the column you are dragging.
29. Double-Click to AutoFit
For a quick and easy way to adjust column width to fit the content, use the double-click method:
- Step 1: Select the column or columns you want to adjust.
- Step 2: Position your cursor on the right boundary of the column header.
- Step 3: Double-click the boundary. The column width will automatically adjust to fit the longest entry in that column.
30. Hiding Columns and Rows
Sometimes, you may need to hide columns or rows to simplify the view or focus on specific data.
- Step 1: Select the column or row you want to hide.
- Step 2: Right-click the selected column or row header.
- Step 3: Choose Hide from the context menu.
31. Unhiding Columns and Rows
To unhide hidden columns or rows:
- Step 1: Select the columns or rows adjacent to the hidden one(s).
- Step 2: Right-click the selected column or row header.
- Step 3: Choose Unhide from the context menu.
32. Using Keyboard Shortcuts for Cell Sizing
Excel offers several keyboard shortcuts to help you adjust cell sizes more efficiently.
- AutoFit Column Width: Select the column(s) and press Alt + H, O, I.
- Format Menu: Select the cell(s) and press Alt + H, O, W to open the Column Width dialog.
- Row Height: Select the cell(s) and press Alt + H, O, H to open the Row Height dialog.
33. Applying Uniform Cell Sizing in Different Excel Versions
The steps for applying uniform cell sizing are generally consistent across different versions of Excel, but there may be minor differences in the user interface.
- Excel 2010: The Format menu is located under the Home tab in the Cells group.
- Excel 2013 and Later: The Format menu remains in the same location as in Excel 2010.
- Excel for Mac: The Format menu can be found under the Home tab on the ribbon.
34. Common Mistakes to Avoid
- Forgetting to Select: Ensure you select the correct columns or rows before making adjustments.
- Overlooking Merged Cells: Merged cells can interfere with cell sizing. Unmerge cells if necessary.
- Ignoring Content: Always consider the content of the cells when determining appropriate sizes.
35. Uniform Cell Sizing in Excel Online
Excel Online offers similar functionality for uniform cell sizing as the desktop version, although some advanced features may be limited.
- Accessing Format Options: The Format options can be found under the Home tab on the ribbon.
- Manual Adjustments: You can manually adjust column widths and row heights by dragging the boundaries.
- AutoFit: The AutoFit feature is also available for automatically adjusting sizes based on content.
36. The Importance of Testing
After applying uniform cell sizing, it’s important to test the worksheet to ensure that everything looks as expected.
- Review Data: Check that all data is visible and readable.
- Print Preview: Use print preview to see how the worksheet will look when printed.
- Share with Others: Share the worksheet with colleagues to get feedback on the formatting.
37. Addressing Specific Industry Needs with Uniform Cell Sizing
Different industries may have specific requirements for cell sizing. For example, financial reports often require precise column widths to accommodate currency symbols and decimal places.
- Financial Services: Use specific column widths to display monetary values accurately.
- Healthcare: Adjust row heights to accommodate detailed patient information.
- Education: Standardize cell sizes to create organized gradebooks and student records.
38. Advanced Formatting Techniques
- Cell Styles: Use cell styles to apply consistent formatting, including cell sizes, across multiple worksheets.
- Themes: Apply themes to change the overall appearance of the worksheet, including default cell sizes.
- Templates: Create custom templates with predefined cell sizes and formatting for future use.
39. Utilizing Third-Party Tools
While Excel provides robust cell sizing features, some third-party tools can offer additional functionality.
- Add-Ins: Explore Excel add-ins that provide advanced formatting and cell sizing options.
- Spreadsheet Software: Consider using specialized spreadsheet software for more complex data management and formatting tasks.
40. Staying Updated with Excel Best Practices
- Continuous Learning: Stay informed about new Excel features and best practices through online courses, tutorials, and community forums.
- Professional Development: Attend workshops and seminars to enhance your Excel skills.
- Experimentation: Practice and experiment with different techniques to find what works best for you.
41. Conclusion: Mastering Uniform Cell Sizing in Excel
Mastering uniform cell sizing in Excel is essential for creating professional, readable, and well-organized spreadsheets. Whether you’re managing financial data, tracking inventory, or analyzing sales figures, consistent cell sizes can significantly improve the clarity and effectiveness of your work. By understanding the different methods and best practices outlined in this article, you can take your Excel skills to the next level.
42. Optimize Your Professional Image with Online Uniforms
Just as uniform cell sizes enhance the presentation of your data, the right uniforms elevate your professional image. At onlineuniforms.net, we offer a wide range of high-quality uniforms for various industries, ensuring your team looks polished and professional.
Ready to optimize your professional image? Visit onlineuniforms.net to explore our diverse collection of uniforms and discover how we can help your team make a lasting impression. Contact us today for a quote and let us assist you in finding the perfect uniform solutions for your business! You can reach us at 1515 Commerce St, Dallas, TX 75201, United States or call us at +1 (214) 651-8600.
FAQ: Uniform Cell Sizing in Excel
43. How do I make all cells the same size in Excel?
To make all cells the same size in Excel, select the entire worksheet by clicking the top-left corner, then adjust the row height and column width using the Format menu under the Home tab.
44. What is the default column width in Excel?
The default column width in Excel is 8.43 characters, which corresponds to approximately 64 pixels.
45. How do I change the default column width for all new Excel workbooks?
To change the default column width for all new Excel workbooks, create a template with your desired settings and save it as a default template.
46. Can I use VBA to set uniform cell sizes?
Yes, you can use VBA to set uniform cell sizes by writing a macro that iterates through all columns and rows, setting their widths and heights to specified values.
47. How do I autofit column width in Excel?
To autofit column width in Excel, select the column(s) you want to adjust, then double-click the right boundary of the column header, or use the Format menu under the Home tab and select AutoFit Column Width.
48. What is the best way to copy column widths from one column to another?
The best way to copy column widths is to select a cell in the column that has the width that you want to use, press Ctrl+C, right-click a cell in the target column, point to Paste Special, and then select Keep Source Columns Widths.
49. How do I change row height in Excel?
To change row height in Excel, select the row(s) you want to adjust, then use the Format menu under the Home tab and select Row Height, entering the desired value.
50. How do I make the row height automatically adjust to fit the content?
To make the row height automatically adjust to fit the content, select the row(s) you want to adjust, then use the Format menu under the Home tab and select AutoFit Row Height.
51. Why are my column widths not staying the same when I open the file on a different computer?
Column widths may appear differently on different computers due to variations in screen resolution and default font settings. Using points as the unit of measurement can help maintain consistency.
52. How do I hide columns or rows in Excel?
To hide columns or rows in Excel, select the column(s) or row(s) you want to hide, right-click the selected header, and choose Hide from the context menu.