
Making uniform cell sizes in Excel is straightforward and enhances your spreadsheet’s readability and professional appearance. Learn effective methods to adjust column widths and row heights for a consistent look. At onlineuniforms.net, we understand the importance of presentation, whether it’s in a spreadsheet or your team’s attire, and this guide will help you achieve just that.
1. What Are the Minimum, Maximum, and Default Cell Sizes in Excel?
Understanding the size limitations in Excel is crucial for effective spreadsheet design. Here’s a breakdown of the minimum, maximum, and default sizes for columns and rows, based on a point scale:
| Type | Min | Max | Default |
|---|---|---|---|
| Column | 0 (hidden) | 255 | 8.43 |
| Row | 0 (hidden) | 409 | 15.00 |
These values define the boundaries within which you can adjust your cell sizes to fit your data perfectly.
2. How to Manually Adjust Column Width in Excel?
Manually adjusting column width offers precise control over your spreadsheet’s layout. Follow these steps to achieve the desired look:
-
Select the column or columns you want to resize.
-
Navigate to Home > Cells > Format.
-
Under Cell Size, choose Column Width.
-
Enter your desired value in the Column width box.
-
Click OK.
Tip: For a quick adjustment, right-click the selected column, choose Column Width, input the value, and click OK.
3. How Can I Autofit Column Width in Excel?
Autofitting column width is a quick way to ensure your data is fully visible. Here’s how to do it:
-
Select the column or columns you wish to adjust.
-
Go to Home > Cells > Format.
-
Under Cell Size, select AutoFit Column Width.
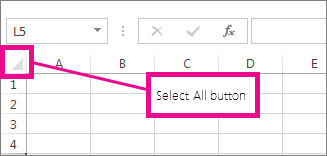
Note: To quickly autofit all columns, select the entire worksheet by clicking the Select All button (the small triangle at the top-left corner), and then double-click any boundary between two column headings.
 Select All button
4. Is There a Way to Copy Column Width in Excel?
Yes, you can easily copy column widths to maintain consistency across your spreadsheet:
- Select a cell within the column that has the width you want to copy.
- Press Ctrl+C (or go to Home > Clipboard > Copy).
- Right-click a cell in the target column, hover over Paste Special, and select Keep Source Column Widths.
This method ensures that the column width is precisely replicated, saving you time and effort.
5. How to Modify the Default Column Width in Excel?
Changing the default column width can save time when starting new spreadsheets. Here’s how:
-
Select the worksheet or workbook you want to modify:
- For a single worksheet, click its sheet tab.
- For the entire workbook, right-click any sheet tab and select Select All Sheets.
-
Go to Home > Cells > Format.
-
Under Cell Size, select Default Width.
-
Enter the new measurement in the Standard column width box and click OK.
Tips: To set a default column width for all new workbooks, create a custom workbook template. Similarly, for worksheets, create a worksheet template.
6. How to Adjust Column Width by Dragging?
Dragging column boundaries is an intuitive way to adjust column widths:
- Single Column: Drag the boundary on the right side of the column heading.
- Multiple Columns: Select the columns, then drag the boundary to the right of any selected column heading.
- Autofit: Select the column(s) and double-click the right boundary of the column heading.
- All Columns: Click Select All, then drag any column heading boundary.
Select All button
7. How to Manually Adjust Row Height in Excel?
Adjusting row height manually allows for precise control over the vertical space in your spreadsheet. Follow these steps:
- Select the row or rows you want to adjust.
- Go to Home > Cells > Format.
- Under Cell Size, select Row Height.
- Enter the desired value in the Row height box, then click OK.
8. How Do I Autofit Row Height in Excel?
Autofitting row height is essential for displaying content that varies in length. Here’s how to do it:
-
Select the row or rows you wish to adjust.
-
Go to Home > Cells > Format.
-
Under Cell Size, select AutoFit Row Height.
Tip: To quickly autofit all rows, select the entire worksheet and double-click the boundary below any row heading.
9. How to Adjust Row Height by Dragging?
Dragging is a straightforward method to adjust row heights:
-
Single Row: Drag the boundary below the row heading.
-
Multiple Rows: Select the rows and drag the boundary below any selected row heading.
-
All Rows: Select Select All and drag the boundary below any row heading.
-
Autofit: Double-click the boundary below the row heading.
10. How Do Uniform Cell Sizes in Excel Enhance Data Presentation?
Using uniform cell sizes in Excel enhances data presentation significantly. Consistency in column widths and row heights makes spreadsheets easier to read and understand. Uniformity contributes to a professional look, which is essential when presenting data to colleagues, clients, or management. By ensuring that all columns and rows are appropriately sized, you prevent text from being cut off or appearing cramped, which can improve data accuracy and comprehension.
11. Can Uniform Cell Sizes Improve Data Accuracy in Spreadsheets?
Yes, uniform cell sizes can improve data accuracy in spreadsheets by preventing misinterpretations caused by inconsistent formatting. When data is displayed in a consistent manner, it reduces the likelihood of errors during data entry or review. Uniformity helps users focus on the content rather than being distracted by visual inconsistencies, ensuring that all information is clearly visible and correctly interpreted.
12. What Are the Best Practices for Achieving Uniform Cell Sizes in Excel?
To achieve uniform cell sizes in Excel, start by selecting all the columns or rows you want to adjust. Use the “Column Width” or “Row Height” option under the “Format” menu to set a specific size. For columns, an alternative is to use the “AutoFit Column Width” feature after entering your data to automatically adjust the width to fit the content. Remember to regularly check your spreadsheet for any inconsistencies and adjust as needed. Additionally, use Excel templates with predefined uniform cell sizes to maintain consistency across multiple projects.
13. How Do I Handle Large Datasets When Applying Uniform Cell Sizes?
When handling large datasets in Excel, applying uniform cell sizes efficiently is essential. Instead of manually adjusting each column or row, use Excel’s formatting tools to apply changes to multiple selections simultaneously. For columns, select all desired columns and set a uniform width. Similarly, for rows, select multiple rows and set a consistent height. Using the “AutoFit Column Width” option after entering data can also help to automatically adjust column widths based on the content, ensuring readability without manual adjustments.
14. What Role Do Excel Templates Play in Maintaining Uniform Cell Sizes?
Excel templates play a crucial role in maintaining uniform cell sizes by providing a pre-formatted structure with consistent column widths and row heights. These templates ensure that every new spreadsheet based on them starts with a standardized layout, which saves time and effort in formatting. By using templates, organizations can enforce consistency across all their Excel documents, which enhances data presentation and reduces the risk of formatting errors.
15. Are There Any Keyboard Shortcuts to Adjust Cell Sizes in Excel?
While Excel doesn’t offer direct keyboard shortcuts to set specific cell sizes, there are shortcuts that can help in adjusting column widths and row heights. For example, Alt + H, O, I will AutoFit the row height, and Alt + H, O, W allows you to enter a specific column width. These shortcuts can significantly speed up the process of formatting your spreadsheets, especially when dealing with large datasets.
16. How Can I Ensure Compatibility When Sharing Spreadsheets With Uniform Cell Sizes?
To ensure compatibility when sharing spreadsheets with uniform cell sizes, save your Excel file in a widely supported format like .xlsx or .xls. Before sharing, double-check that all data is displayed correctly and that no content is cut off due to cell size adjustments. Additionally, inform recipients of the Excel version you used, as older versions may display formatting differently. It’s also a good idea to create a PDF version of your spreadsheet to guarantee that the layout remains consistent regardless of the recipient’s software.
17. How Does Excel’s Page Layout View Affect Uniform Cell Sizes?
Excel’s Page Layout view allows you to specify column widths and row heights in inches, centimeters, and millimeters, providing a more precise control over cell sizes. This is particularly useful when you need to ensure that your spreadsheet fits neatly onto printed pages. By setting exact measurements, you can avoid issues like columns or rows being cut off at the edges, which ensures a professional and polished appearance for your printed documents.
18. What Are Common Mistakes to Avoid When Adjusting Cell Sizes in Excel?
Common mistakes to avoid when adjusting cell sizes in Excel include manually resizing columns and rows one by one, which is time-consuming and prone to inconsistencies. Avoid neglecting the “AutoFit” feature, which can automatically adjust cell sizes to fit content. Be cautious of setting extremely small or large cell sizes that make data unreadable. Also, ensure that you save your Excel file in a compatible format when sharing to prevent formatting issues on different versions of Excel.
19. How Do I Use VBA to Automate Uniform Cell Sizing in Excel?
To automate uniform cell sizing in Excel using VBA (Visual Basic for Applications), you can write a macro that sets specific widths and heights for selected columns and rows. Here’s a basic example:
Sub SetUniformCellSizes()
    Dim ws As Worksheet
    Set ws = ThisWorkbook.Sheets("Sheet1") ' Change "Sheet1" to your sheet name

    Dim col As Range
    For Each col In ws.Columns
        col.ColumnWidth = 15 ' Set your desired column width
    Next col

    Dim rw As Range
    For Each rw In ws.Rows
        rw.RowHeight = 20 ' Set your desired row height
    Next rw
End Sub
This macro iterates through all columns and rows in the specified worksheet and sets their widths and heights to the values you define. You can adjust the ColumnWidth and RowHeight properties as needed.
20. How Can Onlineuniforms.net Help You Achieve a Professional Look Both On and Off the Screen?
At onlineuniforms.net, we believe that a professional look is essential, whether you’re presenting data in a spreadsheet or representing your company in person. Just as uniform cell sizes enhance the clarity and presentation of your data, our high-quality uniforms ensure that your team looks polished and professional. We offer a wide range of customizable uniforms that can be tailored to meet your specific needs, helping you maintain a consistent and professional image across all aspects of your business.
Ready to enhance your professional image? Visit onlineuniforms.net today to explore our wide selection of uniforms and customization options. Contact us at +1 (214) 651-8600 or visit our Dallas showroom at 1515 Commerce St, Dallas, TX 75201, United States, to see how we can help your team look their best!
FAQ Section
1. How do I quickly adjust the width of multiple columns in Excel?
To quickly adjust the width of multiple columns, select the columns you want to resize, then drag the boundary of any selected column heading to the desired width. All selected columns will adjust uniformly.
2. Can I set different column widths for different worksheets in the same Excel file?
Yes, you can set different column widths for different worksheets in the same Excel file. Each worksheet operates independently, allowing you to customize the column widths as needed.
3. How do I ensure that my column widths remain consistent when I add new data?
To ensure consistent column widths when adding new data, use the “AutoFit Column Width” feature or set a default column width for the worksheet. This will automatically adjust the column widths to accommodate the new content.
4. Is it possible to hide columns or rows in Excel without affecting the uniform cell sizes?
Yes, you can hide columns or rows without affecting the uniform cell sizes of the remaining visible cells. Hiding a column or row simply removes it from view, but the formatting of the other cells remains unchanged.
5. How do I copy the formatting, including cell sizes, from one worksheet to another?
To copy the formatting, including cell sizes, from one worksheet to another, select the cells with the formatting you want to copy, then use the “Format Painter” tool. Click on the target worksheet and select the cells where you want to apply the formatting.
6. What is the best way to print an Excel sheet with uniform cell sizes?
To print an Excel sheet with uniform cell sizes, go to “Page Layout” view and adjust the column widths and row heights to fit your content. Use the “Print Preview” feature to ensure that everything is displayed correctly before printing.
7. How do I prevent text from wrapping within a cell while maintaining uniform cell sizes?
To prevent text from wrapping within a cell while maintaining uniform cell sizes, select the cells and uncheck the “Wrap Text” option in the “Alignment” section of the “Format Cells” dialog box.
8. Can I use conditional formatting to adjust cell sizes based on cell values?
No, conditional formatting in Excel cannot directly adjust cell sizes based on cell values. Conditional formatting is primarily used to change the appearance of cells, such as font style, background color, and borders.
9. How do I create an Excel template with predefined uniform cell sizes?
To create an Excel template with predefined uniform cell sizes, start by setting the desired column widths and row heights in a new Excel file. Then, go to “File” > “Save As” and select “Excel Template (*.xltx)” as the file type. Save the file in the default templates folder for easy access.
10. How do I troubleshoot inconsistent cell sizes in Excel?
To troubleshoot inconsistent cell sizes in Excel, first, select the entire worksheet and use the “AutoFit Column Width” and “AutoFit Row Height” features. If inconsistencies persist, manually inspect the column widths and row heights for any discrepancies and adjust as needed. Also, check for hidden columns or rows that may be affecting the overall layout.