Miniature painting can be a rewarding hobby, but tackling intricate camouflage patterns, especially those of the WWII German Waffen-SS, can seem daunting. This guide, inspired by the techniques of expert painter Andres Amian Fernandez, breaks down the process of painting early Waffen-SS camo schemes, specifically the Spring and Autumn Plane Tree patterns, for your 28mm miniatures. We’ll focus on achieving a recognizable and impactful look on the tabletop, rather than a historically perfect replica, ensuring your miniatures stand out while retaining their authentic Waffen-SS character.
Painting camouflage on miniatures requires a slightly different approach than historical accuracy alone. For gaming miniatures, exaggeration and simplification are key to visual impact. This method prioritizes creating a striking effect that’s easily identifiable at gaming distances. This isn’t the only way to paint these patterns, but it’s a reliable method to achieve excellent results.
While the camo application is shown after the miniature is fully painted, you can integrate it at any stage that suits your comfort level. Some painters prefer to apply camo first to avoid accidentally painting over finished details.
The color references used are primarily from Vallejo Model Color (VMC) and Vallejo Panzer Aces (VPA), with equivalent Wargames Foundry (F) references provided for convenience.
Painting Spring Plane Tree Camo on Waffen SS Uniforms
This section details how to paint the Spring Plane Tree camouflage pattern, a common early war Waffen Ss Uniform variant.
Step 1: Base Coat and Initial Highlights
Start with VMC 823 Luftwaffe Cam. Green or F 70B French Dragoon Green as your base color (fig.1). Apply this evenly across the areas intended for camouflage, such as smocks and helmet covers.
 Fig 1: Base coat of Luftwaffe Cam. Green applied to the miniature
Next, enhance the fabric folds and creases by applying highlights using VMC 833 German Cam. Bright Green or F 70C French Dragoon Green (fig.2). Focus on raised areas to create depth and visual interest.
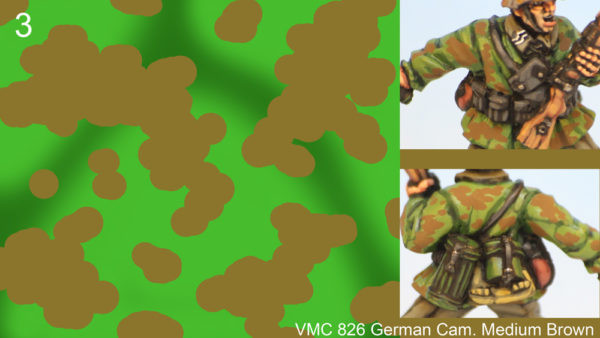 Fig 2: Highlights added with German Cam. Bright Green to enhance folds
Step 2: Adding Brown Patches
Introduce the first camouflage patches using VMC 826 German Cam. Medium Brown or F 121B Dark African Flesh (fig.3). Thin the paint to a milky consistency (approximately half paint, half water). This allows for smooth, controlled application. Paint irregular, overlapping oval shapes and smaller spots to create the brown patches.
 Fig 3: Irregular brown patches applied using German Cam. Medium Brown
Step 3: Applying Black Patches
Now, add black patches with VMC 850 Black or F 34A Black (fig. 4). Repeat the same technique as with the brown patches, overlapping some of them. Aim for a balanced coverage of brown and black patches across the uniform.
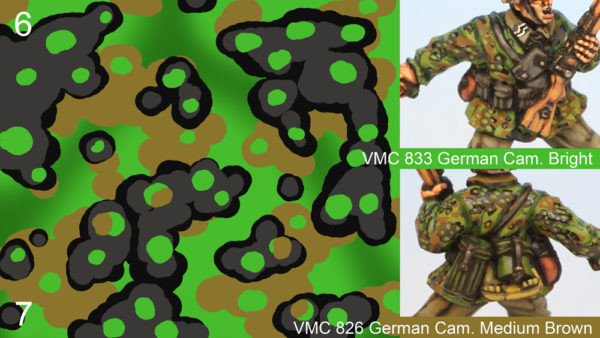 Fig 4: Black patches added, overlapping brown patches for depth
To soften the black slightly, consider adding subtle dark grey highlights. VMC 995 German Grey or F 39B Storm Blue can be used for this purpose (fig. 5).
Step 4: Final Dots and Detailing
The final step involves adding small dots to enhance the camouflage effect. Use VMC 833 German Cam. Bright Green or F 70C French Dragoon Green to dot over the black and brown patches (fig. 6). Then, use VMC 826 German Cam. Medium Brown or F 121B Dark African Flesh to add dots, primarily on the green base areas (fig. 7). This creates the illusion of pattern layers and depth.
To enhance realism, paint small camo patches around straps and belts to indicate that these accessories are worn over the camouflage smock.
Painting Autumn Plane Tree Camo on Waffen SS Uniforms
The Autumn Plane Tree camo pattern follows a similar process to the Spring pattern, but with a warmer color palette to reflect the autumnal tones often seen on Waffen SS uniform variations.
Step 1: Base Coat and Highlights
Begin with a base coat of VPA 332 Japanese Tankcrew Highlight mixed with a touch of VMC 822 German Cam. Black Brown or F 85A German Splinter Tan (fig. 8). Highlight the folds using pure VPA 332 Japanese Tankcrew Highlight or F 85B German Splinter Tan (fig.9) to create depth.
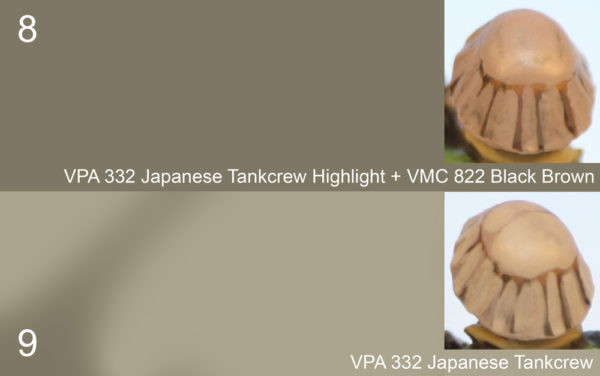 Fig 8: Base coat of mixed Japanese Tankcrew Highlight and German Cam. Black Brown for Autumn Camo
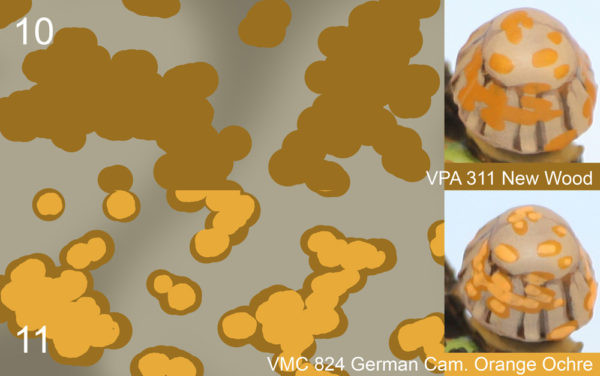 Fig 9: Highlights added with Japanese Tankcrew Highlight for Autumn Camo depth
Step 2: Applying Light Brown Patches and Highlights
Apply patches using VPA 311 New Wood or F 45B Deep Brown Leather (fig.10), using the same technique as the Spring pattern. For greater contrast in the Autumn scheme, highlight these brown patches with VMC 824 German Cam. Orange Ochre or F 7A Buff Leather (fig. 11).
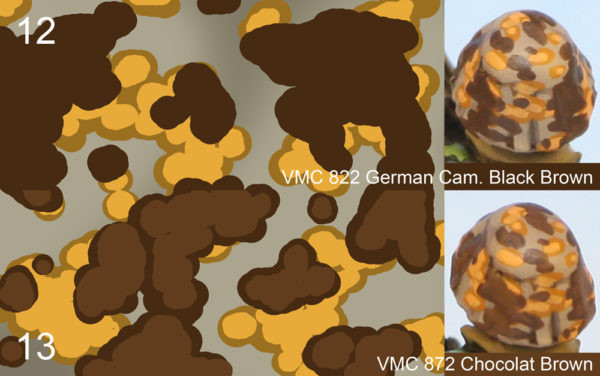 Fig 10: Light brown patches applied for Autumn Camo using New Wood
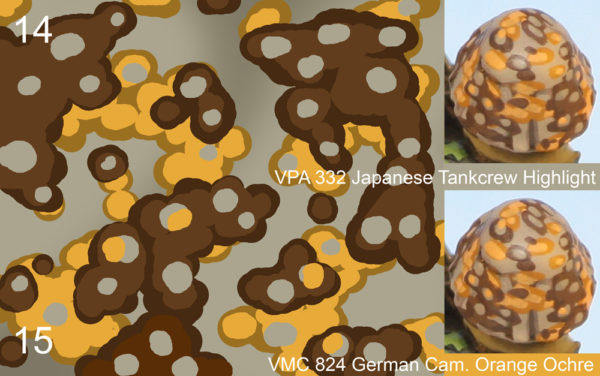 Fig 11: Highlights added to light brown patches with German Cam. Orange Ochre for Autumn contrast
Step 3: Adding Dark Brown Patches and Highlights
Introduce the darker brown patches using VMC 822 German Cam. Black Brown or F 72A Musket Stock Brown (fig. 12). Highlight these patches with VMC 872 Chocolate Brown or F 42A Bay Brown (fig. 13) to add further tonal variation.
Step 4: Final Dots and Detailing for Autumn Camo
Complete the Autumn pattern by adding dots. Use VPA 332 Japanese Tankcrew Highlight or F 85B German Splinter Tan for dots on the brown and lighter patches (fig.14). Then, add dots of VMC 824 German Cam. Orange Ochre or F 7A Buff Leather on the brown patches to create the layered effect (fig. 15), mimicking the overlapping nature of the camouflage.
Varnishing and Pattern Variation
After painting, varnishing your miniatures is crucial for protection. A gloss varnish layer followed by a matt varnish will provide a durable finish and remove unwanted shine. If skipping the gloss coat, ensure you apply at least a matt varnish to eliminate any remaining gloss from the paint.
 Finished Waffen SS miniature with Plane Tree Camo, varnished for protection
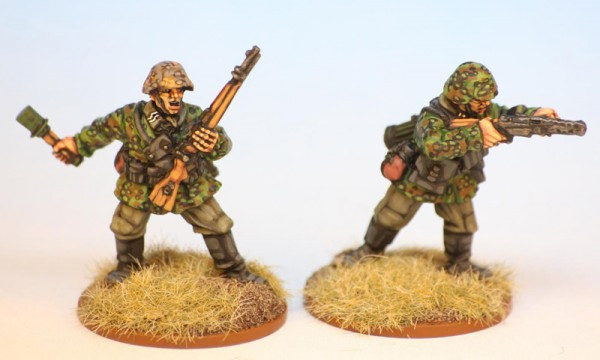
For added visual interest within a unit, consider mixing Spring and Autumn Plane Tree camo patterns. For example, use the Spring pattern on the smock and Autumn on the helmet cover, or vice versa. This variation enriches the overall look and adds a dynamic feel to your Waffen SS miniatures on the tabletop.
 Example of Waffen SS miniatures with mixed Spring and Autumn Plane Tree Camo patterns
Painting Waffen SS uniforms with Plane Tree camo might seem complex initially, but with practice and patience, especially when painting multiple miniatures in batches, you’ll master these techniques. The result will be striking, historically inspired Waffen SS miniatures ready to dominate the wargaming battlefield.