Girl Scout membership pins symbolize a Girl Scout’s commitment and achievements. At onlineuniforms.net, we understand the importance of preserving these emblems when transitioning to a new uniform. This comprehensive guide will help you transfer those cherished pins and badges with care, ensuring your Girl Scout proudly displays her accomplishments on her updated attire. Let’s explore everything from pin placement to uniform updates to ensure your Girl Scout looks her best.
1. Why Transfer Girl Scout Membership Pins to a New Uniform?
Transferring Girl Scout membership pins to a new uniform is a significant part of honoring a Girl Scout’s journey and accomplishments. These pins and badges represent hard work, dedication, and memorable experiences. By transferring them, a Girl Scout:
- Maintains a Connection to Her History: Each pin tells a story of what she has achieved and learned.
- Showcases Her Achievements: Transferring pins allows her to proudly display her accomplishments.
- Promotes Continuity: It provides a sense of continuity as she moves through different Girl Scout levels.
- Instills Pride: Wearing these pins on a new uniform instills a sense of pride and accomplishment.
- Reflects Identity: These emblems become an integral part of her identity as a Girl Scout.
2. Understanding Girl Scout Uniform Transitions
As Girl Scouts advance through different levels, their uniforms change to reflect their growth and achievements. Recognizing these transitions helps in understanding when and how to transfer membership pins:
2.1. Daisy Uniform to Brownie Uniform
Daisies typically wear a blue tunic or vest. When transitioning to Brownies, they move to a brown vest or sash. Key considerations include:
- Pin Placement: The placement of insignia might differ slightly between the Daisy tunic/vest and the Brownie vest/sash.
- New Badges: Brownies will earn new badges that need space on the new uniform.
- Uniform Items: Transfer any earned pins and the membership star to the Brownie uniform.
2.2. Brownie Uniform to Junior Uniform
Brownies wear a brown vest or sash, while Juniors wear a green vest or sash. Here are some critical points:
- Color Change: The shift from brown to green requires careful planning for badge and pin placement.
- Awards: Juniors may earn larger awards that need prominent placement.
- Wings: Brownies “fly up” to Juniors, earning Brownie Wings to add to their uniforms.
2.3. Junior Uniform to Cadette Uniform
Juniors in green transition to Cadettes in khaki. Key aspects include:
- Khaki Transition: The khaki uniform is used through the remaining Girl Scout years, so careful arrangement is crucial.
- Silver Awards: Cadettes may begin earning Silver Awards, which have a specific spot on the uniform.
- Community Service: Cadettes can earn community service bars to add to their collection.
2.4. Cadette Uniform to Senior Uniform
Cadettes and Seniors both wear the khaki uniform, but Seniors may add specific mentoring awards:
- Mentoring Awards: Look for opportunities to add Counselor in Training (CIT) or Volunteer in Training (VIT) awards.
- Ten Year Award: Seniors may receive a Ten Year Award pin.
2.5. Senior Uniform to Ambassador Uniform
Seniors and Ambassadors continue with the khaki uniform, focusing on higher achievements:
- Gold Award: Ambassadors often earn the prestigious Gold Award.
- Service Bars: Additional service bars can be added to reflect continued commitment.
3. Essential Steps Before Transferring Pins
Before you start transferring any pins, preparation is essential for a smooth and organized process:
3.1. Gather Necessary Supplies
Collect all the tools you’ll need to remove and reattach the pins:
- Seam Ripper: For carefully removing badges and patches.
- Needle and Thread: Matching the uniform color for secure attachment.
- Scissors: For trimming any loose threads.
- Pin Backs: Replacement pin backs if any are missing or damaged.
- Pliers: For gently bending pin backs straight.
- Ruler: To ensure accurate placement on the new uniform.
3.2. Plan the Layout
Before attaching anything, plan the layout on the new uniform:
- Refer to Official Guides: Use the Girl Scout official placement guides to ensure correct positioning.
- Consider Space: Think about the space available and how new badges will be added in the future.
- Take a Photo: Capture a photo of the old uniform layout as a reference.
- Lay It Out: Arrange the pins and badges on the new uniform before attaching to get an idea of the final look.
3.3. Inventory Existing Pins and Badges
Take stock of all the pins and badges to ensure nothing is lost during the transfer:
- Make a List: Create a detailed list of each item.
- Check for Damage: Look for any damage that needs repair.
- Clean if Necessary: Gently clean any dirty or tarnished pins.
4. How to Remove Pins from the Old Uniform
Removing pins carefully will help keep the uniform and pins in good condition:
4.1. Using a Seam Ripper
A seam ripper is ideal for removing badges and patches:
- Insert Carefully: Insert the tip of the seam ripper under the stitching.
- Lift and Cut: Gently lift and cut the threads.
- Remove Threads: Use the tip to remove any remaining thread.
- Avoid Tearing: Be careful not to tear the fabric.
4.2. Straightening Bent Pin Backs
Bent pin backs can make reattachment difficult. Here’s how to straighten them:
- Use Pliers: Grip the bent part of the pin back with pliers.
- Apply Gentle Pressure: Apply gentle, steady pressure to straighten the pin back.
- Avoid Breaking: Be careful not to break the pin back.
4.3. Dealing with Damaged Pins
If you find any damaged pins, assess whether they can be repaired or replaced:
- Loose Stones: Re-glue any loose stones with a small amount of craft glue.
- Broken Clasps: Replace broken clasps with new ones.
- Tarnished Metal: Clean tarnished metal with a jewelry cleaning cloth.
5. Pin Placement Guide for Each Girl Scout Level
Correct pin placement is critical for adhering to Girl Scout standards and traditions. Here’s a detailed guide for each level:
5.1. Daisy Pin Placement
Daisies have specific areas on their tunics or vests for pins and badges.
- Insignia Tab: Positioned on the upper left front of the tunic or vest.
- American Flag Patch: On the upper right sleeve.
- Girl Scout Council Identification Set: Below the American Flag Patch.
- Troop Numerals: Below the Council Identification Set.
- Membership Stars and Discs: Centered above the insignia tab.
- Girl Scout Membership Pin: Placed on the insignia tab.
- World Trefoil Pin: Placed on the insignia tab.
- Petal and Promise Badges: Typically arranged around the promise circle on the lower part of the tunic or vest.
- Cookie Activity Pin: Worn below the badges or on the opposite side of the uniform.
5.2. Brownie Pin Placement
Brownies transition to a vest or sash with a similar layout:
- Insignia Tab: Positioned on the upper left front of the vest or sash.
- American Flag Patch: On the upper right of the vest.
- Girl Scout Council Identification Set: Below the American Flag Patch.
- Troop Numerals: Below the Council Identification Set.
- Membership Stars and Discs: Centered above the insignia tab.
- Girl Scout Membership Pin: Placed on the insignia tab.
- World Trefoil Pin: Placed on the insignia tab.
- Troop Crest: Usually on the right side of the vest, above any badges.
- Bridge to Girl Scout Brownie Award: Below the insignia tab on the left.
- Badges: Placed on the front of the vest or sash, following the official layout.
5.3. Junior Pin Placement
Juniors move to a green vest or sash, maintaining similar insignia placement:
- Insignia Tab: Positioned on the upper left front of the vest or sash.
- American Flag Patch: On the upper right of the vest.
- Girl Scout Council Identification Set: Below the American Flag Patch.
- Troop Numerals: Below the Council Identification Set.
- Membership Stars and Discs: Centered above the insignia tab.
- Girl Scout Membership Pin: Placed on the insignia tab.
- World Trefoil Pin: Placed on the insignia tab.
- Brownie Wings: Above the insignia tab if earned.
- Bronze Award: Next to the World Trefoil pin if earned.
- Bridge to Girl Scout Junior Award: Below the insignia tab on the left.
- Badges: Placed on the front of the vest or sash, following the official layout.
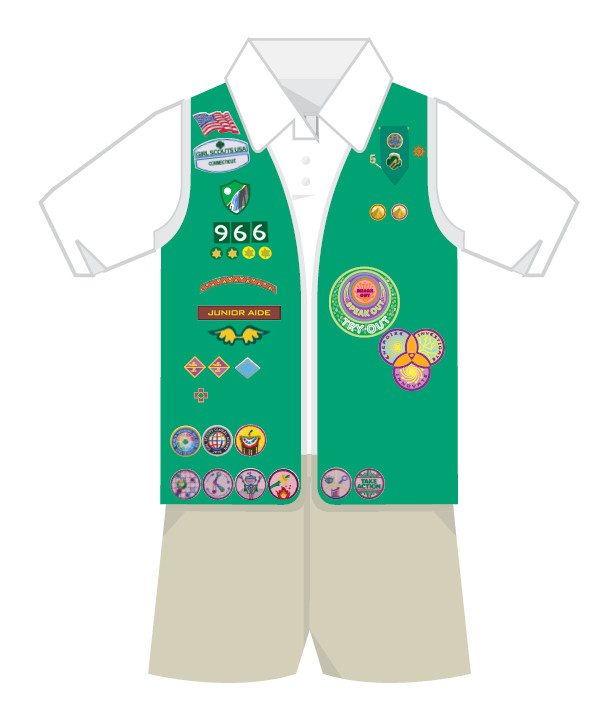 Junior Girl Scout Uniform
5.4. Cadette, Senior, and Ambassador Pin Placement
Cadettes, Seniors, and Ambassadors all use the khaki uniform, allowing for a consistent layout:
- Insignia Tab: Positioned on the upper left front of the vest or sash.
- American Flag Patch: On the upper right of the vest.
- Girl Scout Council Identification Set: Below the American Flag Patch.
- Troop Numerals: Below the Council Identification Set.
- Membership Stars and Discs: Centered above the insignia tab.
- Girl Scout Membership Pin: Placed on the insignia tab.
- World Trefoil Pin: Placed on the insignia tab.
- Silver Torch Award Pin: Added above the insignia tab if earned.
- Cadette/Senior/Ambassador Community Service Bar: Placed below the insignia tab on the left.
- Program Aide Pin: Placed below the community service bar if earned.
- Silver Award Pin: Added next to the World Trefoil pin if earned.
- Gold Award Pin: The highest achievement, placed prominently, often above the World Trefoil pin.
- Badges: Placed on the front of the vest or sash, following the official layout.
6. Attaching Pins to the New Uniform
Once you know where everything goes, follow these steps to securely attach the pins to the new uniform:
6.1. Using Needle and Thread
For badges and patches, sewing is the most secure method:
- Thread the Needle: Use a thread color that matches the uniform.
- Knot the End: Tie a secure knot at the end of the thread.
- Position the Badge: Place the badge in the correct spot.
- Stitch Around the Edges: Sew small, even stitches around the edges of the badge.
- Secure the End: Knot the thread on the back side to secure it.
6.2. Applying Pin Backs
For pins with pin backs, ensure they are securely fastened:
- Insert the Pin: Push the pin through the fabric.
- Attach the Back: Securely attach the pin back.
- Check for Security: Ensure the pin is firmly attached and won’t fall off.
6.3. Iron-On Alternatives
While not as secure as sewing, iron-on adhesives can be used for patches:
- Position the Patch: Place the patch in the correct spot.
- Cover with Cloth: Cover the patch with a thin cloth.
- Iron On: Press with a hot iron for the recommended time.
- Check Adhesion: Ensure the patch is firmly attached; sew if needed for extra security.
7. Tips for Maintaining and Preserving Girl Scout Pins and Badges
To keep your Girl Scout’s pins and badges in excellent condition, consider these tips:
7.1. Storage Solutions
Proper storage can prevent damage and loss:
- Pin Boards: Use pin boards to display and protect pins when not on the uniform.
- Storage Boxes: Store badges and patches in acid-free storage boxes.
- Individual Bags: Keep pins in individual bags to prevent scratching.
7.2. Cleaning and Care
Regular cleaning keeps pins and badges looking their best:
- Gentle Cleaning: Use a soft cloth to gently clean pins.
- Avoid Harsh Chemicals: Avoid harsh chemicals that can damage the finish.
- Jewelry Cleaner: Use jewelry cleaner for metal pins to remove tarnish.
7.3. Repairing and Replacing
Address damage promptly to maintain the integrity of the pins and badges:
- Repair Immediately: Repair any loose or damaged parts as soon as possible.
- Replace Lost Items: Replace any lost items to keep the collection complete.
8. Common Mistakes to Avoid When Transferring Pins
To ensure a smooth transfer process, be aware of these common mistakes:
8.1. Incorrect Placement
Placing pins in the wrong spot detracts from the uniform’s appearance and can be disrespectful to Girl Scout traditions:
- Always Consult Guides: Refer to official placement guides.
- Double-Check: Double-check placement before permanently attaching anything.
8.2. Damaging the Uniform
Rushing the removal process can damage the uniform:
- Use Proper Tools: Use a seam ripper carefully to avoid tearing the fabric.
- Take Your Time: Be patient and avoid pulling forcefully.
8.3. Losing Pins
Losing pins during the transfer is a common issue:
- Keep Inventory: Maintain a detailed inventory of all pins.
- Store Safely: Store pins in a secure place during the transfer.
9. Resources for Girl Scout Uniforms and Insignia
Here are some useful resources for purchasing uniforms and insignia:
9.1. Official Girl Scout Shop
The official Girl Scout Shop is the best source for uniforms and insignia:
- Wide Selection: Offers a wide range of uniforms, badges, and pins.
- Official Merchandise: Ensures you are getting official, approved merchandise.
- Online and In-Store: Available both online and in physical store locations.
9.2. Online Uniform Retailers
Online retailers like onlineuniforms.net offer a variety of options:
- Convenience: Shop from the comfort of your home.
- Selection: Wide selection of uniform items and accessories.
- Customer Service: Look for retailers with excellent customer service.
9.3. Local Girl Scout Councils
Your local Girl Scout council can be a valuable resource:
- Information: Provides information on uniform requirements and local events.
- Support: Offers support and guidance on all Girl Scout-related matters.
10. Frequently Asked Questions (FAQs)
10.1. Can I Iron on All Girl Scout Badges?
No, not all Girl Scout badges can be ironed on. While some badges come with an iron-on backing, sewing them on provides a more secure and durable attachment. For badges without iron-on backing, sewing is the recommended method.
10.2. Where Does the World Trefoil Pin Go?
The World Trefoil Pin is placed on the insignia tab, which is positioned on the upper left front of the uniform, for all Girl Scout levels. It symbolizes the Girl Scout’s connection to the global sisterhood of Girl Guides and Girl Scouts.
10.3. How Do I Replace a Lost Girl Scout Pin?
To replace a lost Girl Scout pin, you can visit the official Girl Scout Shop online or in person. Additionally, your local Girl Scout council may have replacement pins available. Ensure you have the correct pin name and level to get the appropriate replacement.
10.4. What Is the Correct Order of Badges on the Uniform?
The correct order of badges varies depending on the Girl Scout level. Official placement guides from the Girl Scouts of the USA provide detailed diagrams for each level, indicating where specific badges and awards should be placed on the uniform. Always refer to these guides to ensure accurate placement.
10.5. Can I Mix and Match Uniform Pieces?
Mixing and matching uniform pieces depends on the specific guidelines of your local Girl Scout council and troop. While there is some flexibility, it’s essential to adhere to the core uniform requirements for your Girl Scout’s level to maintain a cohesive and respectful appearance.
10.6. How Often Should I Clean Girl Scout Uniforms?
Girl Scout uniforms should be cleaned as needed, depending on the level of activity and exposure to dirt. Regular washing helps maintain the uniform’s appearance and hygiene. Follow the care instructions on the uniform’s label for best results.
10.7. What Do Membership Stars Represent?
Membership stars represent the number of years a Girl Scout has been a registered member. Each star signifies a year of service and participation in Girl Scout activities, highlighting her ongoing commitment and growth within the organization.
10.8. Where Can I Find Official Girl Scout Uniform Guidelines?
Official Girl Scout uniform guidelines can be found on the Girl Scouts of the USA website. These guidelines provide detailed information on uniform requirements, badge placement, and insignia for each Girl Scout level, ensuring accurate and respectful representation.
10.9. How Do I Deal with Fading Uniform Colors?
To deal with fading uniform colors, wash the uniform inside out in cold water with a mild detergent. Avoid using bleach, and dry the uniform on a low setting or hang it to dry. Additionally, consider using color-safe detergents to help preserve the fabric’s color.
10.10. Can I Customize My Girl Scout Uniform?
Customizing a Girl Scout uniform is generally discouraged, as it’s important to maintain a consistent and respectful appearance. However, you can personalize the uniform by adding earned badges and awards in the designated areas, showcasing your Girl Scout’s achievements and experiences.
Transferring Girl Scout membership pins to a new uniform is a meaningful way to honor a Girl Scout’s journey and accomplishments. By following these detailed steps and tips, you can ensure that the transfer process is smooth, organized, and respectful of Girl Scout traditions. Whether you’re transitioning from Daisy to Brownie, Junior to Cadette, or any level in between, onlineuniforms.net is here to support you with high-quality uniforms and accessories.
Ready to update your Girl Scout’s uniform? Visit onlineuniforms.net today to explore our wide selection of Girl Scout uniforms, badges, and accessories. Ensure your Girl Scout looks her best while proudly displaying her achievements. Contact us at +1 (214) 651-8600 or visit our location at 1515 Commerce St, Dallas, TX 75201, United States, for personalized assistance. Let onlineuniforms.net help you celebrate your Girl Scout’s journey with the perfect uniform!