
Are you wondering how to put Boy Scout badges on your uniform correctly? Knowing the proper placement for Boy Scout badges on your uniform is essential for presenting a sharp, respectful appearance. At onlineuniforms.net, we provide a detailed guide to ensure every patch, badge, and insignia is perfectly positioned. We aim to equip you with the knowledge and resources to proudly display your achievements and affiliations within the Boy Scouts of America. Whether you’re a new scout or a seasoned leader, our guidelines and high-quality uniform offerings will help you look your best. Discover the perfect fit and arrangement for your scout uniform through our selection of customizable emblems, insignia, and scout uniform patches.
1. Understanding The Importance Of Proper Boy Scout Uniform Badge Placement
Proper badge placement on a Boy Scout uniform is not just about aesthetics; it’s about honoring tradition, recognizing achievement, and fostering a sense of belonging. Correct placement signifies respect for the organization and its values.
1.1 Why Accuracy Matters
Accuracy in badge placement ensures that the uniform reflects the scout’s accomplishments and rank in a clear, standardized manner. It also demonstrates attention to detail and pride in one’s affiliation with the Boy Scouts of America. According to the Boy Scouts of America’s official guidelines, precise placement is crucial for maintaining uniformity and representing the scout’s journey.
1.2 Reflecting Achievements
Each badge tells a story of personal growth and skill acquisition. When badges are correctly placed, the uniform becomes a visual representation of the scout’s dedication and hard work. Understanding the meaning behind each emblem and displaying them accordingly honors the scout’s commitment.
1.3 Building A Sense Of Belonging
Wearing a correctly badged uniform instills a sense of belonging and unity among scouts. When everyone adheres to the same standards, it creates a cohesive and respectful environment. This shared identity strengthens the bond between scouts and reinforces the values of the organization.
1.4 Adhering To Tradition
Following the established guidelines for badge placement upholds the traditions of the Boy Scouts of America. These traditions have been passed down through generations, and adhering to them shows respect for the history and legacy of the organization.
1.5 Key Takeaways
- Correct badge placement demonstrates respect for the Boy Scouts of America.
- Accurate positioning highlights a scout’s achievements and personal growth.
- Standardized uniforms foster a sense of unity and belonging among scouts.
- Following guidelines honors the traditions and history of the organization.
- Attention to detail in uniform presentation reflects pride and dedication.
2. Essential Components Of The Boy Scout Uniform
To properly place badges, it’s essential to understand the different parts of the Boy Scout uniform. Each component has designated areas for specific patches and insignia.
2.1 The Official Shirt
The official Boy Scout shirt is the primary canvas for displaying achievements and affiliations. It features specific locations for patches on the sleeves, pockets, and shoulder loops. The shirt is typically available in short and long sleeve versions, depending on the climate and scout’s preference.
2.2 Shoulder Loops
Shoulder loops indicate the branch of Scouting the member is currently in. The colors include:
- Blue for Cub Scouts
- Olive for Scouts BSA
- Blaze for Varsity Scouts
- Green for Venturers
- Silver for District and Council
- Gold for Regional and National positions
These loops easily slide onto the shoulder straps of the uniform shirt.
2.3 Pants Or Shorts
The official pants or shorts are typically olive green and are worn with the uniform shirt. While they do not feature badges, they complete the uniform and contribute to the overall appearance.
2.4 Belt
The official Boy Scout belt displays the Boy Scout emblem and is worn with the pants or shorts. It is an essential part of the uniform and helps to keep the trousers neatly in place.
2.5 Socks
Official socks are typically olive green and may have a colored band at the top, depending on the scout’s rank and troop. They are worn with the official pants or shorts to complete the uniform.
2.6 Hat
The official Boy Scout hat is often worn as part of the uniform, particularly during outdoor activities and ceremonies. It may feature the Boy Scout emblem and can provide protection from the sun.
2.7 Neckerchief
The neckerchief is a triangular piece of cloth worn around the neck and secured with a slide or knot. The color and design of the neckerchief can vary by troop and signify the scout’s affiliation.
2.8 Key Takeaways
- The official shirt is the primary area for displaying badges and patches.
- Shoulder loops indicate the branch of Scouting the member belongs to.
- Pants or shorts, belt, and socks complete the uniform ensemble.
- The hat and neckerchief are often worn for specific occasions and activities.
- Understanding each component ensures correct badge placement and overall appearance.
3. Step-By-Step Guide To Patch Placement On The Boy Scout Uniform
Knowing where each patch goes is crucial for a well-presented uniform. This section provides a detailed guide to ensure accurate placement.
3.1 Right Sleeve Patch Placement
The right sleeve is designated for specific patches that signify important aspects of the scout’s affiliation and achievements.
3.1.1 American Flag Patch
The American Flag Patch is a standard element of the Boy Scout uniform and is typically pre-sewn onto the right sleeve. It should be positioned directly below the shoulder seam, symbolizing patriotism and respect for the nation.
3.1.2 Patrol Patch
The Patrol Patch represents the scout’s patrol within their troop. It should be placed directly below the American Flag Patch, centered on the sleeve. According to the Boy Scouts of America’s guidelines, the bottom of the patrol patch should be approximately 4 inches from the shoulder seam. Patrol Patches are 2” patches, they have 3 thread colors with a khaki background and border.
3.1.3 Quality Unit Patch
The Quality Unit Patch is awarded to troops that have achieved the Quality Unit Award. It should be placed directly below the Patrol Patch. Only the most recently earned award should be displayed, indicating the troop’s current standing.
3.2 Left Sleeve Patch Placement
The left sleeve is reserved for patches that denote the scout’s council, troop number, and leadership positions.
3.2.1 Council Shoulder Patch (CSP)
The Council Shoulder Patch (CSP) identifies the scout’s local council. It should be placed at the very top of the left sleeve, flush against the shoulder seam. The CSP is obtained through the local council and cannot be customized by individual troops.
3.2.2 Unit Numeral Patch
The Unit Numeral Patch represents the scout’s troop number. It should be placed directly below the Council Shoulder Patch. Some unit numeral patches include a Veteran Bar, which indicates the number of years the troop has been active. The Veteran Bar is placed above the Unit Numeral Patch.
3.2.3 Position Badge
The Position Badge reflects the scout’s role within the troop, whether elected, assigned, or volunteered. Examples include Senior Patrol Leader, Den Chief, or Patrol Leader. This patch is placed in the center of the left sleeve pocket. If there is no pocket, it should be centered on the sleeve below the Unit Numeral Patch.
3.2.4 Trained Patch
The Trained Patch is awarded to scouts who have completed an official BSA training course. This patch is placed centered below the left sleeve pocket. If there is no pocket, it should be placed below the Position Badge.
3.3 Right Pocket Patch Placement
The right pocket area is primarily used for temporary patches and the Order of the Arrow lodge flap.
3.3.1 Order Of The Arrow Lodge Flap
The Order of the Arrow Lodge flap identifies scouts who are members of an Order of the Arrow lodge. This patch is worn directly on the right pocket flap and is the only approved patch for this location.
3.3.2 Temporary Patch Location
The right pocket is also known as the temporary patch location. Scouts can wear any Scouting patch of their choice here, such as Camporee patches, Summer Camp patches, or custom troop patches. Only one temporary patch can be worn at a time. Patches with a button loop are hung from the right pocket button behind the pocket flap.
3.3.3 Recruiter Patch
The Recruiter Patch is awarded to scouts who recruit another person to join Scouting. This patch is worn centered directly below the right pocket.
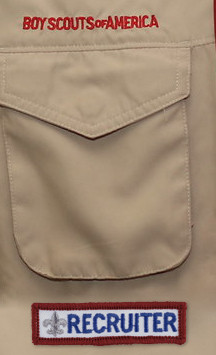 beneath right pocket of a troop uniform recruiter patch
3.4 Left Pocket Patch Placement
The left pocket is used to display the scout’s current BSA rank.
3.4.1 Rank Badge
The Rank Badge should be centered on the left pocket and represent the scout’s most current rank. This badge signifies the scout’s progress and achievements within the Boy Scouts of America.
3.5 Above The Left Pocket
The area above the left pocket is designated for the World Crest and adult award knots.
3.5.1 World Crest
The World Crest is displayed above the left pocket, symbolizing the scout’s affiliation with World Scouting. It should be centered between the left shoulder seam and the top of the left pocket.
3.5.2 Adult Award Knots
Adults may wear knots signifying awards they have earned. Youth are limited to a few knots, such as the Youth Religious Knot, OA Distinguished Service Award, Venturing Silver Award, and Explorer Achievement Award. These knots are placed above the World Crest, centered between the shoulder seam and the top of the pocket.
3.6 Merit Badge Sash
The Merit Badge Sash is not part of the official uniform but is often worn over the uniform during Courts of Honor.
3.6.1 Merit Badges
Merit Badges should be sewn onto the front of the sash in neat, even rows of three. This displays the scout’s achievements and skills in various areas.
3.6.2 Other Patches
Other patches can be sewn on the back of the sash, as long as they are not previously held Badges of Rank or Badges of Office. This provides additional space for displaying achievements and affiliations.
3.7 Key Takeaways
- The right sleeve features the American Flag Patch, Patrol Patch, and Quality Unit Patch.
- The left sleeve displays the Council Shoulder Patch, Unit Numeral Patch, Position Badge, and Trained Patch.
- The right pocket area is used for the Order of the Arrow Lodge flap and temporary patches.
- The left pocket displays the scout’s current Rank Badge.
- The area above the left pocket is designated for the World Crest and adult award knots.
- The Merit Badge Sash is worn during Courts of Honor and displays Merit Badges and other patches.
4. Tips And Tricks For Sewing On Boy Scout Badges
Sewing badges onto a uniform can be a meticulous task. Here are some tips and tricks to ensure a professional and long-lasting result.
4.1 Gathering The Right Supplies
Before you begin, gather all the necessary supplies. This includes:
- Needle and Thread: Use a sturdy needle and thread that matches the color of the patch border or the uniform fabric.
- Scissors: Sharp scissors are essential for trimming excess thread and fabric.
- Pins: Straight pins help to hold the patch in place while you sew.
- Thimble: A thimble protects your finger while pushing the needle through thick fabric.
- Measuring Tape or Ruler: Accurate measurements ensure proper placement of the patch.
- Iron and Ironing Board: Ironing the uniform and patch can help to create a smooth surface for sewing.
4.2 Preparing The Uniform And Patch
Proper preparation is key to a successful sewing project.
- Wash and Iron the Uniform: Start by washing and ironing the uniform to remove any wrinkles or creases. This provides a smooth surface for sewing.
- Position the Patch: Use a measuring tape or ruler to accurately position the patch on the uniform. Refer to the official guidelines for placement.
- Pin the Patch in Place: Use straight pins to secure the patch to the uniform. Place the pins close to the edge of the patch to prevent it from shifting while you sew.
4.3 Sewing Techniques
There are several sewing techniques you can use to attach the patch to the uniform.
- Hand Sewing: Hand sewing is a traditional method that allows for precise control. Use a simple stitch, such as a running stitch or a backstitch, to secure the patch. Keep the stitches small and even for a neat appearance.
- Machine Sewing: Machine sewing can be faster and more efficient, especially for larger patches. Use a sewing machine with a needle appropriate for the fabric thickness. Sew along the edge of the patch, using a straight stitch or a zigzag stitch for added durability.
4.4 Ensuring Durability
To ensure that the patch stays securely attached to the uniform, consider the following tips:
- Reinforce the Edges: Sew around the edges of the patch multiple times to reinforce the stitching. This prevents the patch from fraying or coming loose.
- Use a Strong Thread: Choose a strong, durable thread that can withstand wear and tear. Heavy-duty thread or upholstery thread is a good option.
- Check the Stitches Regularly: Periodically check the stitches to ensure they are still intact. Repair any loose or broken stitches to prevent the patch from falling off.
4.5 Tips For A Professional Finish
To achieve a professional-looking finish, keep the following in mind:
- Conceal the Stitches: Try to conceal the stitches as much as possible by using a thread that matches the patch border or uniform fabric.
- Trim Excess Thread: After sewing, trim any excess thread close to the fabric. This prevents the thread from getting caught or unraveling.
- Iron the Patch: After sewing, iron the patch to smooth out any wrinkles or creases. This gives the patch a neat and professional appearance.
4.6 Key Takeaways
- Gather the right supplies, including a sturdy needle, thread, scissors, and pins.
- Prepare the uniform and patch by washing, ironing, and positioning correctly.
- Use appropriate sewing techniques, such as hand sewing or machine sewing.
- Ensure durability by reinforcing the edges and using strong thread.
- Achieve a professional finish by concealing stitches and trimming excess thread.
5. Common Mistakes To Avoid When Affixing Boy Scout Badges
Even with careful preparation, it’s easy to make mistakes when sewing on Boy Scout badges. Here are some common errors to avoid.
5.1 Incorrect Placement
One of the most common mistakes is placing badges in the wrong location on the uniform. Always refer to the official guidelines for placement to ensure accuracy. Double-check the position before sewing to avoid having to remove and re-sew the patch.
5.2 Using The Wrong Thread Color
Using a thread color that doesn’t match the patch border or uniform fabric can make the stitches stand out and detract from the overall appearance. Choose a thread color that blends in seamlessly with the patch and uniform.
5.3 Sewing Too Loosely
Sewing the patch too loosely can cause it to come off easily. Make sure to use tight, secure stitches that hold the patch firmly in place. Reinforce the edges of the patch for added durability.
5.4 Sewing Too Tightly
Sewing the patch too tightly can pucker the fabric and create an uneven appearance. Avoid pulling the thread too tight while sewing. Keep the stitches even and consistent to prevent puckering.
5.5 Not Reinforcing The Edges
Failing to reinforce the edges of the patch can cause it to fray or unravel over time. Sew around the edges of the patch multiple times to reinforce the stitching and prevent fraying.
5.6 Using The Wrong Type Of Needle
Using the wrong type of needle can damage the fabric or make it difficult to sew. Choose a needle that is appropriate for the thickness and type of fabric. A universal needle or a denim needle works well for most uniform fabrics.
5.7 Ignoring The Uniform Care Instructions
Ignoring the uniform care instructions can damage the fabric or cause the patch to fade or discolor. Always follow the care instructions on the uniform label. Avoid using harsh detergents or bleach that can damage the fabric.
5.8 Key Takeaways
- Double-check the placement of the patch before sewing to ensure accuracy.
- Choose a thread color that matches the patch border or uniform fabric.
- Use tight, secure stitches that hold the patch firmly in place.
- Avoid pulling the thread too tight while sewing to prevent puckering.
- Reinforce the edges of the patch to prevent fraying.
- Use a needle that is appropriate for the fabric thickness.
- Follow the uniform care instructions to prevent damage.
6. Tools And Resources For Accurate Badge Placement
Achieving accurate badge placement is easier with the right tools and resources. This section provides a list of helpful items and where to find them.
6.1 Official Boy Scout Handbook
The Official Boy Scout Handbook is an invaluable resource for understanding uniform guidelines and badge placement. It provides detailed instructions and illustrations for properly positioning each patch and insignia.
6.2 Online Guides And Tutorials
Numerous online guides and tutorials offer step-by-step instructions for badge placement. Websites like onlineuniforms.net provide comprehensive guides with visual aids to assist in the process.
6.3 Measuring Tools
Accurate measuring tools are essential for ensuring precise badge placement. A measuring tape or ruler with both inches and centimeters is ideal. Clear rulers make it easier to align the patch with the uniform.
6.4 Marking Tools
Marking tools can help you mark the exact location for each patch before sewing. Fabric pencils or chalk are good options, as they are easily removable and won’t damage the fabric.
6.5 Sewing Kit
A well-stocked sewing kit is a must-have for any scout or parent. It should include:
- Needles in various sizes
- Thread in matching colors
- Scissors
- Thimble
- Straight pins
- Seam ripper
6.6 Badge Placement Templates
Some companies offer badge placement templates that can be used to accurately position patches on the uniform. These templates are typically made of clear plastic and feature pre-cut slots for each patch.
6.7 Local Scout Shop
Your local scout shop is a great resource for all things Boy Scouts. The staff can provide guidance on uniform guidelines and badge placement. They also sell official patches, insignia, and sewing supplies.
6.8 Online Forums And Communities
Online forums and communities dedicated to Boy Scouts can be a valuable source of information and support. You can ask questions, share tips, and get advice from experienced scouts and leaders.
6.9 Key Takeaways
- Refer to the Official Boy Scout Handbook for uniform guidelines and badge placement.
- Utilize online guides and tutorials for step-by-step instructions.
- Use accurate measuring tools to ensure precise placement.
- Mark the location for each patch with fabric pencils or chalk.
- Keep a well-stocked sewing kit with essential supplies.
- Consider using badge placement templates for added accuracy.
- Visit your local scout shop for guidance and official supplies.
- Join online forums and communities for information and support.
7. Understanding The Significance Of Different Boy Scout Badges
Each Boy Scout badge represents a specific achievement or affiliation. Understanding the meaning behind these badges adds significance to the uniform.
7.1 Rank Badges
Rank badges signify a scout’s progress through the ranks of Boy Scouts. The ranks include:
- Scout
- Tenderfoot
- Second Class
- First Class
- Star
- Life
- Eagle
Each rank badge represents a set of skills and requirements that the scout must master.
7.2 Merit Badges
Merit badges are awarded to scouts who complete specific requirements in a variety of subjects, such as camping, first aid, and citizenship. Earning merit badges allows scouts to explore their interests and develop valuable skills.
7.3 Religious Emblems
Religious emblems are awarded to scouts who participate in religious programs and activities. These emblems recognize the scout’s commitment to their faith and spiritual growth.
7.4 Activity Patches
Activity patches are awarded to scouts who participate in specific events or activities, such as camporees, summer camps, and service projects. These patches commemorate the scout’s involvement and achievements.
7.5 Leadership Positions
Leadership position patches denote the scout’s role within the troop, such as Senior Patrol Leader, Patrol Leader, or Den Chief. These patches recognize the scout’s leadership skills and responsibilities.
7.6 Training Awards
Training awards are given to scouts who complete official BSA training courses, such as Introduction to Leadership Skills for Troops (ILST) or National Youth Leadership Training (NYLT). These awards recognize the scout’s commitment to developing their leadership abilities.
7.7 Service Awards
Service awards are given to scouts who perform significant service to their community or the Boy Scouts of America. These awards recognize the scout’s dedication to serving others.
7.8 Key Takeaways
- Rank badges signify a scout’s progress through the ranks of Boy Scouts.
- Merit badges are awarded for completing requirements in various subjects.
- Religious emblems recognize a scout’s commitment to their faith.
- Activity patches commemorate participation in specific events or activities.
- Leadership position patches denote a scout’s role within the troop.
- Training awards recognize the completion of official BSA training courses.
- Service awards are given for significant service to the community or BSA.
8. Maintaining Your Boy Scout Uniform
Proper maintenance is essential for keeping your Boy Scout uniform looking its best. Here are some tips for cleaning and caring for your uniform.
8.1 Washing Instructions
Always follow the washing instructions on the uniform label. In general, it’s best to wash the uniform in cold water with a mild detergent. Avoid using bleach, as it can damage the fabric or cause the colors to fade.
8.2 Drying Instructions
Tumble dry the uniform on low heat or hang it to dry. Avoid using high heat, as it can shrink the fabric or damage the patches.
8.3 Ironing Instructions
Iron the uniform on a low to medium setting. Use a pressing cloth to protect the fabric from direct heat. Pay special attention to the collar, cuffs, and pockets.
8.4 Patch Care
To protect the patches on your uniform, avoid washing it too frequently. Spot clean any stains or dirt on the patches with a mild detergent and a soft cloth.
8.5 Storage
Store your uniform in a cool, dry place away from direct sunlight. Hang it on a hanger to prevent wrinkles. You can also store it in a garment bag to protect it from dust and dirt.
8.6 Repairs
Repair any tears or loose seams on your uniform as soon as possible. Use a needle and thread to mend the fabric. If you’re not comfortable making repairs yourself, take the uniform to a tailor.
8.7 Key Takeaways
- Follow the washing instructions on the uniform label.
- Tumble dry on low heat or hang to dry.
- Iron on a low to medium setting.
- Spot clean stains on patches with a mild detergent.
- Store in a cool, dry place away from direct sunlight.
- Repair any tears or loose seams promptly.
9. Customizing Your Boy Scout Uniform
While there are specific guidelines for badge placement, there are also ways to personalize your Boy Scout uniform and make it your own.
9.1 Temporary Patches
As mentioned earlier, the right pocket is designated as the temporary patch location. This is a great place to display patches from camporees, summer camps, or other special events. You can change out the temporary patch as often as you like to reflect your current interests and activities.
9.2 Neckerchief
The neckerchief is another area where you can express your personality. Many troops have their own unique neckerchief designs that reflect their history and traditions. You can also purchase or create custom neckerchiefs that showcase your interests and hobbies.
9.3 Hat
The Boy Scout hat can also be customized with patches or pins. Some scouts like to add patches from their favorite events or merit badges to their hat.
9.4 Merit Badge Sash
The merit badge sash is a great way to showcase the merit badges you’ve earned. You can arrange the badges in any order you like, and you can also add other patches or insignia to the sash.
9.5 Key Takeaways
- Use the temporary patch location to display patches from special events.
- Choose a neckerchief that reflects your personality or troop traditions.
- Customize your hat with patches or pins.
- Arrange your merit badges on the sash in any order you like.
10. Frequently Asked Questions (FAQ) About Boy Scout Badge Placement
Here are some frequently asked questions about Boy Scout badge placement:
10.1 Where does the American flag patch go on a Boy Scout uniform?
The American flag patch is typically pre-sewn onto the right sleeve of the uniform, directly below the shoulder seam.
10.2 How do I attach a patch with a button loop?
Patches with a button loop are hung from the right pocket button behind the pocket flap.
10.3 Can I wear more than one temporary patch on my uniform?
No, only one temporary patch can be worn at a time on the right pocket.
10.4 Where does the World Crest go on the uniform?
The World Crest is displayed above the left pocket, centered between the left shoulder seam and the top of the pocket.
10.5 What is the Council Shoulder Patch (CSP)?
The Council Shoulder Patch (CSP) identifies the scout’s local council and is placed at the very top of the left sleeve, flush against the shoulder seam.
10.6 How do I know where to place each patch on my uniform?
Refer to the Official Boy Scout Handbook or online guides for detailed instructions and illustrations.
10.7 Can adults wear knots on their uniform?
Yes, adults may wear knots signifying awards they have earned, placed above the World Crest on the left pocket.
10.8 What is the purpose of the merit badge sash?
The merit badge sash is worn over the uniform during Courts of Honor to display the merit badges a scout has earned.
10.9 How do I clean my Boy Scout uniform?
Follow the washing instructions on the uniform label, typically washing in cold water with a mild detergent and avoiding bleach.
10.10 Where can I buy official Boy Scout patches and insignia?
Official Boy Scout patches and insignia can be purchased at your local scout shop or online at the BSA’s official website. You can also find a wide selection at onlineuniforms.net.
Mastering the art of putting Boy Scout badges on a uniform correctly is essential for any scout. Proper placement honors tradition, recognizes achievement, and fosters a sense of belonging. By following the guidelines and tips outlined in this comprehensive guide, you can ensure that your uniform is a proud representation of your accomplishments and affiliations within the Boy Scouts of America. Whether you’re a new scout or a seasoned leader, a well-badged uniform reflects your commitment to the values and traditions of the organization.
Ready to perfect your Boy Scout uniform? Visit onlineuniforms.net today to explore our wide selection of high-quality uniforms, patches, and accessories. Whether you need a new uniform shirt, specific badges, or custom options, we have everything you need to look your best. Contact us for a quote and let our expert team assist you in finding the perfect fit and arrangement for your scout uniform. With onlineuniforms.net, achieving a sharp, respectful appearance has never been easier.
Address: 1515 Commerce St, Dallas, TX 75201, United States
Phone: +1 (214) 651-8600
Website: onlineuniforms.net