
Changing the bullet point size uniformly in Microsoft Word can enhance readability and maintain a consistent, professional appearance in your documents, and onlineuniforms.net is here to guide you through the process. Discover efficient methods to adjust bullet sizes, ensuring your lists are visually appealing and tailored to your specific needs. Explore customizable options and expert tips for creating polished, well-formatted documents.
1. Understanding Bullet Point Formatting in Microsoft Word
Understanding how bullet points are formatted in Microsoft Word is crucial for creating well-structured and visually appealing documents. Let’s dive into the basics.
1.1. What are Bullet Points and Why Use Them?
Bullet points are visual cues used to organize information in a list format. They highlight key points and improve readability by breaking down text into manageable chunks. According to a study by the Nielsen Norman Group, lists with bullet points increase readability by 47%. Using bullet points makes it easier for readers to scan and grasp the essential information quickly.
1.2. Default Bullet Point Settings in Microsoft Word
By default, Microsoft Word applies a standard bullet style and size. These settings are often suitable for general use, but sometimes, you need to customize them to match your document’s style. The default bullet size is typically linked to the font size of the text, but you can adjust it independently.
1.3. Accessing Bullet Point Formatting Options
To access bullet point formatting options:
- Select the list you want to modify.
- Go to the Home tab.
- In the Paragraph group, click the arrow next to the Bullets icon.
- Choose Define New Bullet to open the customization panel.
1.4. Different Types of Bullet Points Available
Microsoft Word offers various bullet point styles, including:
- Solid circles: The most common and widely used style.
- Open circles: A lighter, less intrusive option.
- Squares: Provide a more modern and geometric look.
- Arrows: Useful for creating a sense of direction or sequence.
- Symbols: A wide range of characters and symbols for unique bullet points.
1.5. Understanding the Relationship Between Font Size and Bullet Size
The size of the bullet points is generally tied to the font size of the list text. However, you can adjust the bullet size independently to create visual contrast or maintain a consistent look across different font sizes. Experimenting with this relationship can significantly improve the visual appeal of your documents.
2. Step-by-Step Guide to Uniformly Changing Bullet Point Size
To ensure a consistent and professional look in your documents, it’s essential to know how to uniformly change the bullet point size in Microsoft Word. Follow these steps to achieve this:
2.1. Selecting the List You Want to Modify
First, select the bulleted list you want to change. You can do this by:
- Clicking and dragging: Click at the beginning of the list and drag your mouse to the end.
- Double-clicking: Double-click on any bullet point in the list to select the entire list.
Ensuring the entire list is selected is crucial for applying changes uniformly.
2.2. Accessing the “Define New Bullet” Option
Next, access the “Define New Bullet” option:
-
Go to the Home tab on the Ribbon.
-
In the Paragraph group, find the Bullets icon.
-
Click the drop-down arrow next to it.
-
Select Define New Bullet.
This action opens a dialog box where you can customize the bullet point.
2.3. Choosing a New Bullet Character or Symbol
In the “Define New Bullet” dialog box, you can choose a new character or symbol for your bullet points:
- Click the Symbol button.
- A Symbol dialog box appears, offering a wide range of characters.
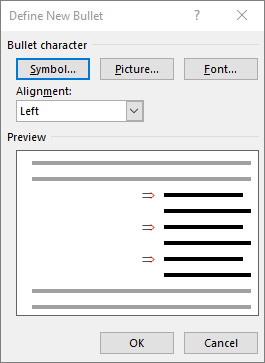 Define New Bullet screen with arrows
 - Select the character you want to use as your bullet point.
- Click OK to return to the “Define New Bullet” dialog box.
2.4. Adjusting the Font Size of the Bullet Point
To adjust the font size of the bullet point:
- In the “Define New Bullet” dialog box, click the Font button.
- The Font dialog box opens, where you can modify various font attributes.
- In the Size field, enter the desired font size for your bullet point.
- Click OK to apply the changes and close the Font dialog box.
2.5. Previewing and Applying the Changes
Before finalizing the changes, preview them to ensure they meet your expectations:
- In the “Define New Bullet” dialog box, the Preview area shows how the new bullet point will look.
- If you are satisfied with the preview, click OK to apply the changes to your selected list.
- If not, repeat the steps above to fine-tune the bullet point size and style.
By following these steps, you can uniformly change the bullet point size in Microsoft Word, enhancing the visual appeal and readability of your documents. At onlineuniforms.net, we understand the importance of attention to detail and professional presentation, whether it’s in document formatting or selecting the right uniforms for your team.
3. Alternative Methods for Changing Bullet Point Size
While the “Define New Bullet” method is common, there are alternative ways to change the bullet point size in Microsoft Word. Here are a few techniques that can help you achieve the desired look efficiently:
3.1. Using the Font Formatting Options
You can directly modify the font attributes of the bullet points using the font formatting options available in the Home tab.
- Select the bullet points in your list. To do this, click on one bullet point, and all bullets in the list should be selected.
- Go to the Home tab on the Ribbon.
- In the Font group, adjust the font size using the font size dropdown or the increase/decrease font size buttons.
This method changes the size of the bullet points along with the text. If you only want to change the bullet size, you’ll need to adjust the text size separately.
3.2. Modifying List Styles
List styles allow you to save and reuse specific formatting settings for bulleted lists. Here’s how to modify a list style to change bullet point size:
- Go to the Home tab.
- In the Styles group, click the More arrow to open the Styles pane.
- Find the list style you want to modify (e.g., List Bullet) and right-click on it.
- Select Modify.
- In the Modify Style dialog box, click Format at the bottom left and choose Numbering.
- Click the Font button to adjust the font size of the bullet points.
- Click OK to save the changes to the list style.
Any list using this style will now have the updated bullet point size.
3.3. Using Keyboard Shortcuts
Keyboard shortcuts can speed up the process of changing bullet point sizes.
-
Select the bullet points in your list.
-
Use the following shortcuts:
- Ctrl + ]: Increase font size.
- Ctrl + [: Decrease font size.
These shortcuts change the font size, including the bullet points. Remember to adjust the text size separately if needed.
3.4. Applying a Pre-existing Style with Desired Bullet Size
If you have a pre-existing style with the desired bullet size, you can apply it to your list:
- Select the list you want to change.
- Go to the Home tab.
- In the Styles group, select the style with the desired bullet size.
This method quickly applies all the formatting settings of the chosen style, including the bullet point size.
3.5. Utilizing the Format Painter Tool
The Format Painter tool allows you to copy formatting from one area to another. This can be useful if you have a bullet point with the desired size and want to apply it to other lists.
- Select the bullet point with the desired formatting.
- Click the Format Painter button in the Home tab.
- Select the list you want to change.
The formatting, including the bullet size, will be copied to the selected list.
4. Advanced Tips for Bullet Point Customization
Customizing bullet points beyond basic size adjustments can significantly enhance the visual appeal and readability of your documents. Here are some advanced tips to help you create professional and engaging bulleted lists.
4.1. Changing Bullet Point Color
Changing the color of your bullet points can help them stand out and align with your document’s design.
- Select the bullet points in your list.
- Go to the Home tab.
- In the Font group, click the arrow next to the Font Color icon.
- Choose the desired color from the color palette.
Using a color that complements your text and background can make your lists more visually appealing.
4.2. Adjusting Bullet Point Alignment
Proper alignment ensures that your bullet points are neatly organized and easy to read.
-
Select the bullet points in your list.
-
Right-click and choose Adjust List Indents.
-
In the Adjust List Indents dialog box, you can adjust the:
- Bullet position: Controls the horizontal position of the bullet.
- Text indent: Controls the indentation of the text.
- Add tab character at: Specifies where the text starts after the bullet.
Adjusting these settings can help you achieve the perfect alignment for your bulleted lists.
4.3. Using Pictures as Bullet Points
For a unique touch, you can use pictures as bullet points. This is particularly useful for branding or adding visual interest.
- Select the bullet points in your list.
- Go to the Home tab and click the arrow next to the Bullets icon.
- Select Define New Bullet.
- In the Define New Bullet dialog box, click Picture.
- Choose a picture from your files or use Bing Image Search to find one online.
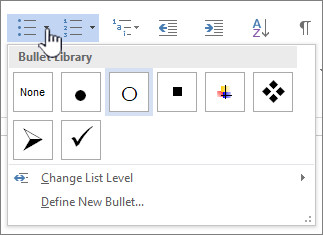 Chosing a new bullet style
 - Click OK to use the picture as your bullet point.
4.4. Creating Multi-Level Bulleted Lists
Multi-level bulleted lists, also known as nested lists, help organize complex information into hierarchical structures.
- Start with a basic bulleted list.
- To create a sub-level, click on a bullet point and press the Tab key.
- To move back to a higher level, press Shift + Tab.
- Customize each level with different bullet styles and sizes to enhance clarity.
4.5. Saving Custom Bullet Point Styles for Future Use
Saving custom bullet point styles ensures consistency across all your documents.
- Format a bulleted list with your desired settings.
- Select the list and go to the Home tab.
- In the Styles group, click the More arrow to open the Styles pane.
- Click Create a Style.
- Give your style a name and click Modify to further customize it.
- Click OK to save the style.
You can now apply this style to any list in any document.
4.6. Using Different Bullet Styles for Different Levels
In multi-level lists, using different bullet styles for each level can improve readability.
- Create a multi-level list.
- Select the bullet points at each level.
- Use the Define New Bullet option to assign different bullet styles to each level.
For example, you can use solid circles for the first level, open circles for the second level, and squares for the third level.
4.7. Adjusting the Space Between Bullet and Text
Adjusting the space between the bullet and text can improve readability and visual appeal.
- Select the bullet points in your list.
- Right-click and choose Adjust List Indents.
- Modify the Text indent to increase or decrease the space between the bullet and text.
- Click OK to apply the changes.
4.8. Applying Bullet Point Changes to Specific Sections
Sometimes, you may only want to apply bullet point changes to specific sections of your document.
- Select the specific sections of the list you want to modify.
- Apply the desired bullet point changes using the methods described above.
This allows you to maintain different formatting styles within the same document.
4.9. Clearing Bullet Point Formatting
If you want to remove bullet point formatting and start over:
- Select the bullet points in your list.
- Go to the Home tab.
- In the Paragraph group, click the Bullets icon to remove the bullet points.
- To reapply bullet points, click the Bullets icon again and choose a new style.
5. Troubleshooting Common Issues
Even with a clear guide, you might encounter some issues while changing bullet point sizes in Microsoft Word. Here are common problems and how to troubleshoot them.
5.1. Bullet Points Not Changing Size Uniformly
Problem: Sometimes, when you try to change the bullet point size, not all bullets change uniformly. This can be frustrating, especially when you need a consistent look.
Solution:
- Ensure the Entire List is Selected: Double-check that you’ve selected the entire list. Click and drag from the beginning to the end of the list to ensure all bullet points are included.
- Apply Changes Through “Define New Bullet”: Use the “Define New Bullet” option as described in Section 2. This method ensures that the changes are applied uniformly across the entire list.
- Check for Conflicting Styles: Sometimes, different parts of your list might have different styles applied. Clear any conflicting styles by selecting the list and choosing “Clear Formatting” from the Home tab.
5.2. Bullet Points Reverting to Default Size
Problem: After changing the bullet point size, they revert to the default size when you close and reopen the document or continue typing.
Solution:
- Modify the List Style: The best way to prevent this is to modify the list style itself. Follow the steps in Section 3.2 to modify the list style. This ensures that the changes are saved as part of the style and will persist.
- Save the Document in the Correct Format: Ensure that you save your document in the .docx format. Older formats like .doc might not retain all formatting changes.
- Check for AutoCorrect Options: Sometimes, AutoCorrect settings can interfere with your formatting. Go to File > Options > Proofing > AutoCorrect Options. In the “AutoFormat As You Type” tab, uncheck “Automatic bulleted lists” and “Automatic numbered lists” to prevent Word from automatically changing your formatting.
5.3. Inconsistent Bullet Point Spacing
Problem: The spacing between the bullet points and the text is inconsistent, making the list look disorganized.
Solution:
- Adjust List Indents: Right-click on the list and choose “Adjust List Indents.” In the dialog box, adjust the “Bullet position” and “Text indent” to create consistent spacing.
- Use the Ruler: You can also use the ruler at the top of the Word window to adjust the indents. If the ruler is not visible, go to the View tab and check the “Ruler” box.
- Check Paragraph Formatting: Ensure that the paragraph formatting (Line Spacing) is consistent throughout the list. Select the list, go to the Home tab, and in the Paragraph group, adjust the line spacing options.
5.4. Bullet Points Not Aligning Properly
Problem: The bullet points do not align properly with the text, creating a misaligned and unprofessional look.
Solution:
- Use the Adjust List Indents Option: As mentioned above, the “Adjust List Indents” option is crucial for aligning bullet points correctly. Experiment with different settings until you achieve the desired alignment.
- Check for Hidden Characters: Sometimes, hidden characters (like extra spaces or tabs) can cause alignment issues. Show hidden characters by clicking the “Show/Hide ¶” button in the Home tab. Delete any unnecessary characters that might be affecting the alignment.
- Reset the List: If all else fails, try resetting the list by removing the bullet points and re-applying them. Select the list, click the Bullets icon to remove the bullets, and then click it again to reapply them.
5.5. Difficulty Changing Bullet Point Color
Problem: You are unable to change the color of the bullet points, or the color changes are not being applied correctly.
Solution:
- Select Only the Bullet Points: Ensure that you are only selecting the bullet points and not the text. Sometimes, selecting the text along with the bullet points can prevent the color change from being applied correctly.
- Use the Font Color Option: Go to the Home tab, and in the Font group, use the Font Color option to change the color of the selected bullet points.
- Check for Conflicting Styles: As with size issues, conflicting styles can prevent color changes from being applied. Clear any conflicting styles by selecting the list and choosing “Clear Formatting” from the Home tab.
By addressing these common issues and following the troubleshooting steps, you can effectively manage and customize bullet points in Microsoft Word. Remember, consistent formatting enhances the readability and professionalism of your documents. And just like ensuring your documents are well-formatted, onlineuniforms.net ensures your team looks professional with high-quality, consistently styled uniforms.
6. Best Practices for Using Bullet Points in Documents
Using bullet points effectively can significantly improve the readability and organization of your documents. Here are some best practices to keep in mind:
6.1. Use Bullet Points to Highlight Key Information
Bullet points are ideal for emphasizing essential information, making it easier for readers to scan and understand the main points.
- Use bullet points to break down complex topics into smaller, more manageable chunks.
- Highlight key features, benefits, or steps in a process.
- Emphasize important facts or figures.
6.2. Keep Bullet Pointed Items Concise
Each bullet point should be brief and to the point. Aim for short phrases or sentences that convey the necessary information without overwhelming the reader.
- Avoid long, rambling sentences.
- Use active voice to make your points clear and direct.
- Focus on one main idea per bullet point.
6.3. Maintain Consistency in Bullet Point Style
Consistency in bullet point style enhances the professional look of your document.
- Use the same type of bullet point throughout the document (e.g., solid circles, squares, or custom symbols).
- Maintain consistent spacing and indentation for all bullet points.
- Ensure that the font size and color of the bullet points are uniform.
6.4. Use Parallel Structure in Bullet Pointed Lists
Parallel structure means that each bullet point in a list should follow the same grammatical structure. This makes the list easier to read and understand.
- If one bullet point starts with a verb, all bullet points should start with a verb.
- If one bullet point is a complete sentence, all bullet points should be complete sentences.
- Use the same tense and voice throughout the list.
6.5. Avoid Overusing Bullet Points
While bullet points are useful, overusing them can make your document look cluttered and disorganized.
- Use bullet points strategically to highlight the most important information.
- Avoid using bullet points for every sentence or paragraph.
- Consider using headings, subheadings, and paragraphs to organize your content in addition to bullet points.
6.6. Use Multi-Level Lists Sparingly
Multi-level lists can be helpful for organizing complex information, but they can also be confusing if overused.
- Use multi-level lists only when necessary to show hierarchical relationships.
- Limit the number of levels to avoid overwhelming the reader.
- Use different bullet styles for each level to improve clarity.
6.7. Proofread Your Bullet Pointed Lists Carefully
Always proofread your bullet pointed lists to ensure that they are free of errors.
- Check for spelling and grammar mistakes.
- Ensure that the bullet points are properly aligned and formatted.
- Verify that the information is accurate and up-to-date.
6.8. Align Bullet Points with Your Brand
If you are creating documents for your business, consider aligning your bullet points with your brand.
- Use brand colors for your bullet points.
- Use custom symbols that reflect your brand identity.
- Ensure that your bullet point style is consistent with your overall brand aesthetic.
6.9. Consider Accessibility
When creating bullet pointed lists, keep accessibility in mind to ensure that your documents are usable by everyone.
- Use clear and concise language.
- Provide alternative text for custom bullet point symbols.
- Ensure that there is sufficient contrast between the bullet points and the background.
6.10. Test Your Bullet Pointed Lists
Before finalizing your document, test your bullet pointed lists to ensure that they are effective.
- Ask others to review your lists and provide feedback.
- Check how the lists look on different devices and screen sizes.
- Ensure that the lists are easy to read and understand.
By following these best practices, you can use bullet points effectively to enhance the readability and organization of your documents. Just as these tips help you create polished documents, onlineuniforms.net helps businesses and organizations present a professional image with high-quality, well-designed uniforms.
7. How to Choose the Right Bullet Point Style for Your Document
Selecting the appropriate bullet point style can significantly enhance the overall impact and readability of your document. Here’s how to choose the right bullet point style:
7.1. Consider the Tone and Purpose of Your Document
The tone and purpose of your document should guide your choice of bullet point style.
- Formal Documents: For professional reports, business proposals, or academic papers, opt for simple and understated bullet points like solid circles or squares. These convey a sense of professionalism and seriousness.
- Informal Documents: For blog posts, marketing materials, or internal memos, you can use more creative and visually appealing bullet points like arrows, checkmarks, or custom symbols.
- Educational Materials: In educational settings, consider using numbered lists or bullet points that indicate a sequence or process.
7.2. Match Bullet Points to Your Brand Identity
If you are creating documents for your business, aligning your bullet points with your brand identity can reinforce your brand message and create a cohesive look.
- Brand Colors: Use your brand colors for the bullet points to create a visual connection to your brand.
- Custom Symbols: Use custom symbols that reflect your brand logo or values.
- Consistent Style: Maintain a consistent bullet point style across all your documents to build brand recognition.
7.3. Ensure Readability and Clarity
The primary goal of bullet points is to improve readability and clarity. Choose a bullet point style that enhances these qualities.
- Contrast: Ensure that there is sufficient contrast between the bullet points and the background to make them easily visible.
- Size: Choose a bullet point size that is appropriate for the font size of your text.
- Spacing: Adjust the spacing between the bullet points and the text to create a clean and uncluttered look.
7.4. Avoid Overly Decorative or Distracting Bullet Points
While creative bullet points can add visual interest, avoid using styles that are too decorative or distracting.
- Simplicity: Opt for simple and clean bullet point styles that do not detract from the content.
- Professionalism: Avoid using bullet points that are too childish or unprofessional.
- Consistency: Ensure that the bullet point style is consistent with the overall tone and style of your document.
7.5. Consider the Target Audience
Your target audience should also influence your choice of bullet point style.
- Age: For younger audiences, you can use more playful and colorful bullet points.
- Industry: Different industries have different standards for document formatting. Research the conventions in your industry and choose a bullet point style that is appropriate.
- Culture: Be mindful of cultural differences when choosing bullet point styles. Some symbols or colors may have different meanings in different cultures.
7.6. Use Numbered Lists for Sequential Information
If you are presenting information in a specific order or sequence, use numbered lists instead of bullet points.
- Steps in a Process: Use numbered lists to outline the steps in a process.
- Rankings: Use numbered lists to rank items in order of importance.
- Instructions: Use numbered lists to provide clear and concise instructions.
7.7. Test Different Styles
Experiment with different bullet point styles to see what works best for your document.
- Preview: Use the preview feature in Microsoft Word to see how the bullet points will look in your document.
- Feedback: Ask others to review your document and provide feedback on the bullet point style.
- A/B Testing: If you are creating marketing materials, consider A/B testing different bullet point styles to see which ones perform best.
7.8. Follow Accessibility Guidelines
Ensure that your bullet point style is accessible to all users, including those with disabilities.
- Alternative Text: Provide alternative text for custom bullet point symbols.
- Contrast: Ensure that there is sufficient contrast between the bullet points and the background.
- Screen Readers: Test your document with a screen reader to ensure that the bullet points are properly recognized.
7.9. Refer to Style Guides
If you are creating documents for a specific organization or publication, refer to their style guide for guidance on bullet point formatting.
- Company Style Guide: Follow your company’s style guide to ensure consistency across all documents.
- Publication Style Guide: If you are submitting a document for publication, adhere to the publication’s style guide.
- Industry Standards: Follow industry standards for document formatting.
7.10. Keep It Simple and Professional
Ultimately, the best bullet point style is one that is simple, professional, and enhances the readability of your document. Avoid styles that are too flashy or distracting and focus on creating a clean and organized presentation.
8. Real-World Examples of Effective Bullet Point Usage
To illustrate the best practices for using bullet points, let’s look at some real-world examples across different industries and document types.
8.1. Business Reports
In business reports, bullet points are used to summarize key findings, highlight recommendations, and present data in a clear and concise manner.
- Example: A sales report might use bullet points to list the top-performing products, key customer segments, and strategies for increasing sales.
- Style: Simple, solid circles or squares are typically used to maintain a professional tone.
8.2. Marketing Materials
Marketing materials, such as brochures and flyers, use bullet points to highlight the benefits of a product or service and capture the reader’s attention.
- Example: A brochure for a new software product might use bullet points to list its key features, benefits, and pricing options.
- Style: More creative bullet points, such as checkmarks or arrows, can be used to add visual interest.
8.3. Educational Materials
Educational materials, such as textbooks and lesson plans, use bullet points to organize information, present key concepts, and provide clear instructions.
- Example: A textbook chapter on the American Revolution might use bullet points to list the causes of the war, key battles, and important figures.
- Style: Numbered lists or bullet points that indicate a sequence or process are commonly used.
8.4. Technical Documentation
Technical documentation, such as user manuals and installation guides, uses bullet points to provide step-by-step instructions and explain complex procedures.
- Example: A user manual for a new electronic device might use bullet points to list the steps for setting up the device, connecting it to the internet, and using its various features.
- Style: Simple, numbered lists are typically used to provide clear and concise instructions.
8.5. Resumes and Cover Letters
Resumes and cover letters use bullet points to highlight skills, experience, and achievements.
- Example: A resume might use bullet points to list job responsibilities, accomplishments, and relevant skills.
- Style: Simple, solid circles or squares are commonly used to maintain a professional appearance.
8.6. Meeting Agendas
Meeting agendas use bullet points to outline the topics to be discussed and keep the meeting on track.
- Example: A meeting agenda might use bullet points to list the items to be discussed, the time allotted for each item, and the person responsible for leading the discussion.
- Style: Simple, solid circles or squares are typically used.
8.7. Project Management Plans
Project management plans use bullet points to outline tasks, timelines, and responsibilities.
- Example: A project management plan might use bullet points to list the project goals, key milestones, and tasks to be completed.
- Style: Numbered lists or bullet points that indicate a sequence or priority are commonly used.
8.8. Websites and Blog Posts
Websites and blog posts use bullet points to break up text, highlight key information, and improve readability.
- Example: A blog post about the benefits of exercise might use bullet points to list the physical, mental, and emotional benefits of regular exercise.
- Style: More creative bullet points, such as checkmarks or arrows, can be used to add visual interest.
8.9. Presentations
Presentations use bullet points to summarize key points and keep the audience engaged.
- Example: A presentation on the importance of customer service might use bullet points to list the key principles of good customer service and the benefits of providing excellent service.
- Style: Large, simple bullet points are typically used to ensure readability from a distance.
8.10. Email Communication
Email communication can use bullet points to highlight key information and make the email easier to read.
- Example: An email summarizing the results of a meeting might use bullet points to list the key decisions made and the action items assigned to each team member.
- Style: Simple, solid circles or squares are typically used to maintain a professional tone.
By examining these real-world examples, you can gain a better understanding of how to use bullet points effectively in your own documents. Remember to consider the tone, purpose, and audience of your document when choosing a bullet point style.
9. Tools and Resources for Enhanced Document Formatting
Enhancing your document formatting involves more than just adjusting bullet point sizes. Several tools and resources can help you create professional and visually appealing documents.
9.1. Microsoft Word Built-In Features
Microsoft Word offers a range of built-in features that can significantly improve your document formatting.
- Styles: Use styles to maintain consistent formatting throughout your document. Styles allow you to define and apply formatting settings (e.g., font, size, color, spacing) to headings, paragraphs, and lists.
- Templates: Microsoft Word provides a variety of templates for different types of documents, such as resumes, reports, and brochures. These templates can serve as a starting point for your document and help you create a professional-looking design.
- Themes: Themes allow you to apply a consistent color scheme and font set to your entire document. This can help you create a cohesive and visually appealing design.
- Table of Contents: Use the table of contents feature to automatically generate a table of contents based on your document’s headings. This makes it easier for readers to navigate your document.
- Header and Footer: Use headers and footers to add consistent information to the top and bottom of each page, such as page numbers, document titles, and company logos.
- Section Breaks: Use section breaks to divide your document into different sections and apply different formatting to each section. This is useful for creating documents with varying layouts.
9.2. Online Grammar and Style Checkers
Online grammar and style checkers can help you identify and correct errors in your writing, ensuring that your documents are clear and professional.
- Grammarly: Grammarly is a popular online grammar and style checker that provides real-time feedback on your writing. It can help you identify and correct errors in grammar, spelling, punctuation, and style.
- ProWritingAid: ProWritingAid is another popular online grammar and style checker that offers a range of features, including grammar checking, style editing, and plagiarism detection.
- Hemingway Editor: The Hemingway Editor is a free online tool that helps you simplify your writing and make it more readable. It highlights complex sentences, adverbs, and passive voice, making it easier for you to improve your writing.
9.3. Online Design Tools
Online design tools can help you create visually appealing documents, even if you don’t have any design experience.
- Canva: Canva is a popular online design tool that offers a range of templates and design elements for creating professional-looking documents. It is easy to use and requires no design experience.
- Adobe Spark: Adobe Spark is another online design tool that allows you to create visually appealing graphics, web pages, and videos. It offers a range of templates and design elements.
- Piktochart: Piktochart is an online tool that helps you create infographics, presentations, and reports. It offers a range of templates and design elements that you can customize to create your own unique designs.
9.4. Font Resources
Choosing the right font can significantly impact the readability and visual appeal of your document. Several online resources can help you find the perfect font for your document.
- Google Fonts: Google Fonts is a free online library of fonts that you can use in your documents and websites. It offers a wide range of fonts in various styles and weights.
- Adobe Fonts: Adobe Fonts is a subscription-based font service that offers a library of high-quality fonts. It is integrated with Adobe Creative Cloud, making it easy to use in Adobe applications.
- Font Squirrel: Font Squirrel is a website that offers a collection of free fonts for commercial use. It offers a range of fonts in various styles and weights.
9.5. Image Resources
Images can add visual interest to your documents and help you communicate your message more effectively. Several online resources offer free and paid images that you can use in your documents.
- Unsplash: Unsplash is a website that offers a collection of high-quality, free images that you can use for any purpose.
- Pexels: Pexels is another website that offers a collection of free images and videos that you can use for any purpose.
- Pixabay: Pixabay is a website that offers a collection of free images, videos, and music that you can use for any purpose.
9.6. Style Guides and Formatting Tutorials
Style guides and formatting tutorials can provide guidance on how to format your documents according to industry standards and best practices.
- The Chicago Manual of Style: